- ERP
- Document Home
-
Financial Accounting
- Chart of Accounts
- Ledger Books
- Type of Vouchers
- All Types of Transaction
- Double Entry System
- Cashbook
- Cash & Cash Equivalents
- Bank Reconciliation
- Financial Statement
- Income Statement
- Balance Sheet
- Changes in Equity Statement
- Cash Flow Statement
- Cheque Management
- Fund Transfer
- Trial Balance
- Payroll Accounting
- Break Even Point
- Multi-Currency Function
- Money & Cheque Receipt
- Reports
- Changing Account Type
- Human Resource Management
- CRM
- Disciplinary Management
- Inventory Control
- MRP for General Industries
- MRP for Aluminium Production
- Supply Chain Management
- RMA
- Asset Management
- Service Billing
- Utility Billing
- Product Serial
- Fleet Management
- Loan & Investment
- Merchandize Management
- LC Management
- Procurement
- WHM for Cold Storage
- Task Management
- Document Management System
- Support Ticketing System
- Backup & Restore
- API Integration
- Sales
- General Configurations
- Budget Maintenance
- Center
- Road Transport Authorization
- POS
- FAQ
- Party Management
- PrismERP Android Application
HOW TO CONFIGURE PrismPOS
First & foremost task will be to install PrismPOS installer for POS configure. After that, configure the installer before login. Otherwise you won't be able to login into installer.
Next Step is for the configuration of prismPOS.
1. How to configure prismPOS:
First of all, open the installer after installing PrismPOS. Now for configuration option , click on the "Settings" icon of the installer login right side. The screenshot is given below:

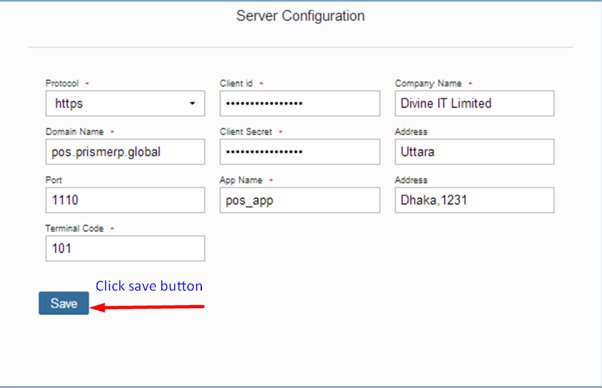
After clicking the button, a server configuration page will appear where you need to configure with PrismERP for login. All red star ( * ) are mandatory required field that needs to be filled up. Check out the image below:

(i) Now, how you will configure:
a) Protocol name as http,
b) Domain name as pos.prismerp.global.
c) Port as blank " 80 "
d) Terminal code as 101
e) Client id as " JidkMFxpJ4BNUDGI "
f) Client secret as " cXRfbTpJ5RalygEG "
g) App name as pos_app
h) Company name as Divine IT Limited
i) Address as Uttara
j) Address as Dhaka,1231
(ii) Protocol : http

(iii) Domain name: PrismERP domain name like pos.prismerp.global

(iv) Port: If the prismERP copy host has any port in that case you have to use the port on port field like port 1110. Otherwise it should be blank.

(v) Terminal Code:
In the prismERP copy where you create a terminal code from " settings->POS->POS terminal list " , In the list page you will get a terminal code like " 101 " which has to be input in terminal code field of configuration page. Screenshot is given below:


(vi) Client id:
In the Prism copy create an application user by going "Settings->user->Authentication API->list of application"
And then get a client id like " JidkMFxpJ4BNUDGI " after that input the id into the client id field in configuration.


(vii) App name:
Similar process like previous of application user: Settings->user->authentication API->list of application ,
From the list of application, get app name like " pos_app " and after that input in app name field of server configuration page. Screenshots are given below sequentially:


(viii) Company name:
Input your company name like for example "Divine IT Limited" It’s also a required field as like other field. Without this, configuration will not be applicable
(ix) Address:
In the configuration page, there are two field of address. Give proper input of your address in both the fields. For example: 1st field address Uttara and 2nd is Dhaka, 1231. When printing sale order invoice both the field of given address will be displayed in the invoice head, so make sure you give the proper input of adress in two fields.
(X)Saving the configuration:
2) How to Log in to the PrismPOS system
After completing configuration, Now login into PrismPOS . Create a user name and password from " Settings->User->List of user "
(Example: User name: pos10 , Password: 1)

3) How to create and see sale order:
After loging into the system go to " Sale order " and add option to create sale order. Then Select products from POS. You can also input product barcode (press F3), customer name (press F4), select product (press F2), customer phone no. The payments can be done by cash & card.
After creating sale order, save and print the order. After completing the sale order, you can check the sale order from the sale order list (sale order->click on the " list ").
If you mistakenly make refresh while creating sale order by pressing F5 then that sale order will be saved as draft. In order to check the draft press F10.


4) How to sync product:
First go to the product List (Product->Product list) then click on " sync ". After clicking sync you will get all your products frequently in the list. Screenshot is given below for understanding

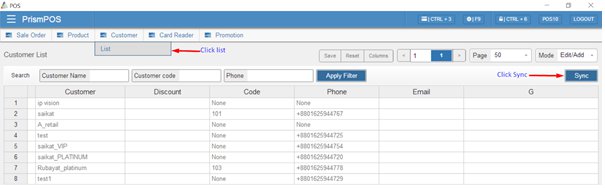
5) How to sync customer:
In same way go to customer list (Customer->click list) then click " Sync " . After adding new customer and then syncing, you can see those new customer in the list.
6) How to sync card reader:
Go to Card reader-> List then click :" Sync "
If adding a new card device then type in the list by clicking sync and then you can see the new device and the type in the list

7) How to sync promotion:
If you add a new promotion for any occasion then at first see the promotional offer from the promotion list . (Go to promotion->promotion click list then click sync). After adding promotion from the promotion list, you can also see promotion from product list as well . (Go to promotion->promotion product list )
