Vehicle Management
Add Vehicle Information:
For registration a new vehicle go to Vehicle > New Vehicle
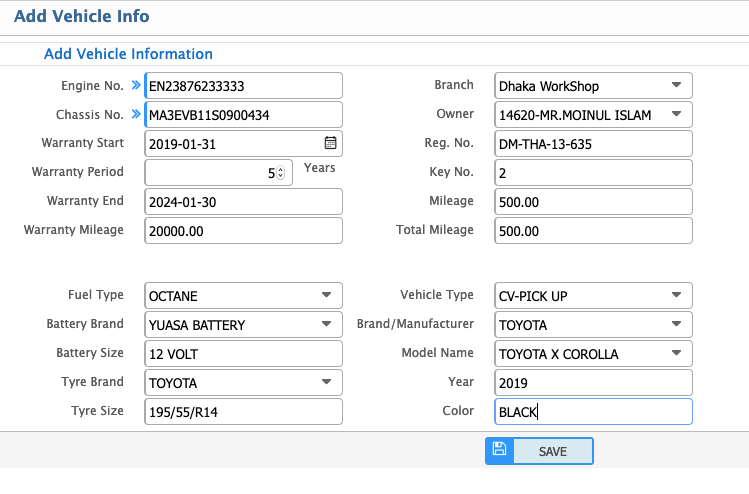
To register a new vehicle, the following fields must be completed as per the provided requirements:
Vehicle Identification Information:
- Engine No: Enter the engine number of the vehicle.
- Chassis No: Provide the chassis number of the vehicle.
- Reg. No: Specify the registration number of the vehicle.
- Key No: Record the key number of the vehicle.
Warranty Information:
- Warranty Start Date: Enter the warranty start or sale date.
- Warranty Period: Specify the duration of the warranty.
- Warranty End Date: Provide the warranty end date.
- Warranty Mileage: Record the mileage covered under warranty.
Vehicle Specifications:
- Fuel Type: Specify the type of fuel the vehicle uses (e.g., Petrol, Diesel, CNG, etc.).
- Battery Brand: Indicate the brand of the vehicle's battery.
- Battery Size: Provide the size of the battery.
- Tyre Brand: Specify the brand of the tyres.
- Tyre Size: Provide the size of the tyres.
- Mileage: Enter the mileage of the vehicle at the time of registration.
- Total Mileage: Specify the total mileage during vehicle registration.
- Vehicle Type: Define the type of the vehicle (e.g., SUV, Sedan, Truck).
- Brand/Manufacturer: Record the brand or manufacturer of the vehicle.
- Model Name: Enter the name of the model.
- Year: Specify the manufacturing year of the vehicle.
- Color: Indicate the color of the vehicle.
Ownership and Branch Details:
- Branch: Enter the branch name to which the vehicle is assigned.
- Owner: Record the name of the vehicle owner.
Vehicle Information List:
After registration a vehicle, you will see the all vehicle registration list. To see the vehicle registration list go to Vehicle > Vehicle List
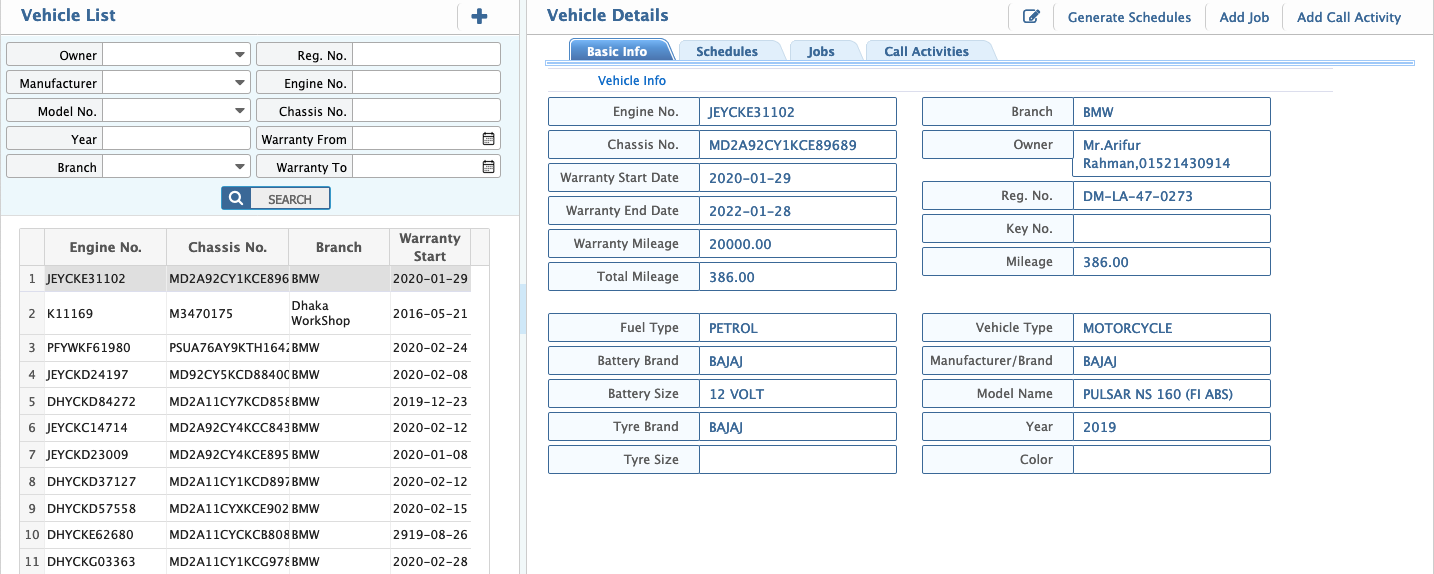
After selecting a specific vehicle from the Vehicle Registration List, you can view and manage its details and associated activities.
Features and Actions:
-
Basic Information:
Displays the essential details of the selected vehicle, such as registration number, mileage, owner, warranty details, etc. -
Generate Service Schedule:
Click on the Generate Schedule button to create a service schedule for the vehicle. This helps in planning and tracking periodic maintenance or servicing. -
Add Job:
Use the Add Job button to assign or log a specific job related to the vehicle (e.g., repair, maintenance tasks). -
Add CRM Call Activity:
Click on the Add Call Activity button to log CRM activities such as customer follow-ups, inquiries, or issue resolution calls.
Tabs for Tracking:
- Schedule Tab: View all service schedules associated with the vehicle.
- Jobs Tab: Access a comprehensive list of all jobs or tasks related to the vehicle.
- Call Activity Tab: Monitor and manage all logged CRM call activities.
Add Job:
How to Add a Job:
You can add a job in two ways:
-
From the Generated Service Schedule List (Scheduled Jobs):
- Navigate to Servicing Schedule > Servicing Schedule List.
- Search for the desired schedule of the specific vehicle using the search filter.
- Locate the relevant schedule in the list.
- Click on the Add Job button on the right side of the schedule entry.
- This method links the job directly to the selected service schedule, ensuring alignment with planned maintenance.
-
Adding a Job Directly (Unscheduled Jobs):
- Navigate to Job > Add Job.
- Fill in the required details, such as the vehicle, type of job, and other necessary information.
- Save the job.

This method is useful for ad-hoc or unscheduled tasks that need immediate attention or do not relate to a predefined service schedule.
Job Information Fields:
When adding a new job, the following fields need to be filled out to ensure accurate record-keeping and tracking:
- Job For: Specify the type of job (e.g., maintenance, repair, inspection).
- Vehicle Information: Displays all basic details about the vehicle (e.g., registration number, model, mileage).
- Update Total Mileage: Enter the updated total mileage of the vehicle at the time of job creation.
- Receiving Date: Specify the date the job is being opened or the vehicle is received.
- Receiving Time: Enter the time the vehicle is received.
- Expected Delivery Date: Indicate the anticipated delivery date for completing the job.
- Expected Delivery Time: Specify the anticipated delivery time.
- Delivery Date & Time: Record the actual date and time when the job is completed and the vehicle is delivered.
- Branch: Select the branch where the job is being opened.
- Delivery Branch: Specify the branch from which the vehicle will be delivered post-job completion.
- Receive By (Service Engineer): Enter the name of the service engineer responsible for receiving the vehicle.
- Assign To (Technician): Assign the technician who will work on the job.
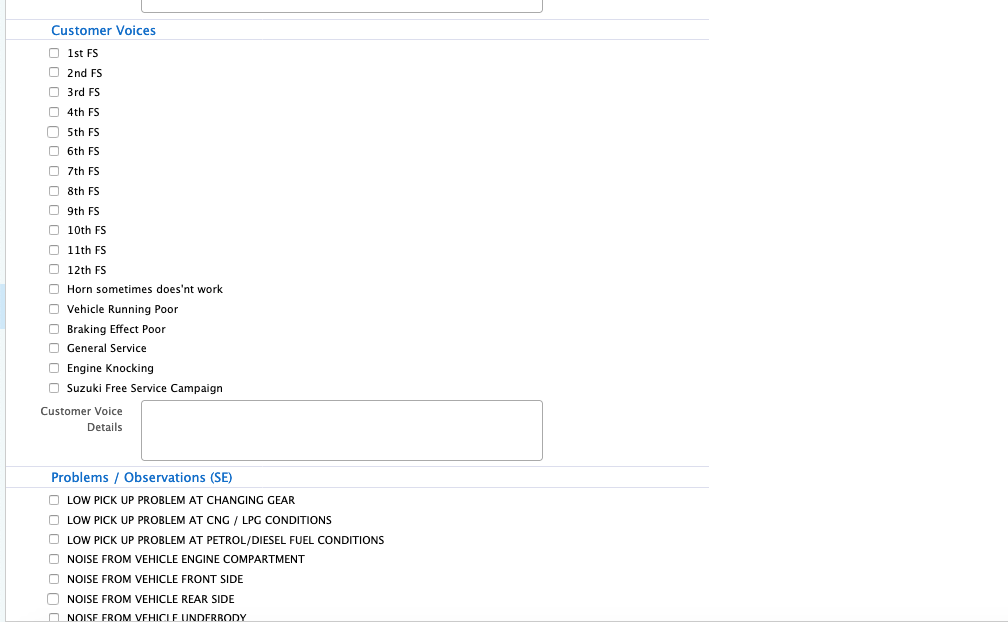
- Customer Voice: Record a list of issues or concerns reported by the customer.
- Problems/Observation (Service Engineer): Document the service engineer’s observations and initial diagnosis based on the customer’s input.
Job List:
After adding a job you will see the all job list. To see the job list go to Job > Job List
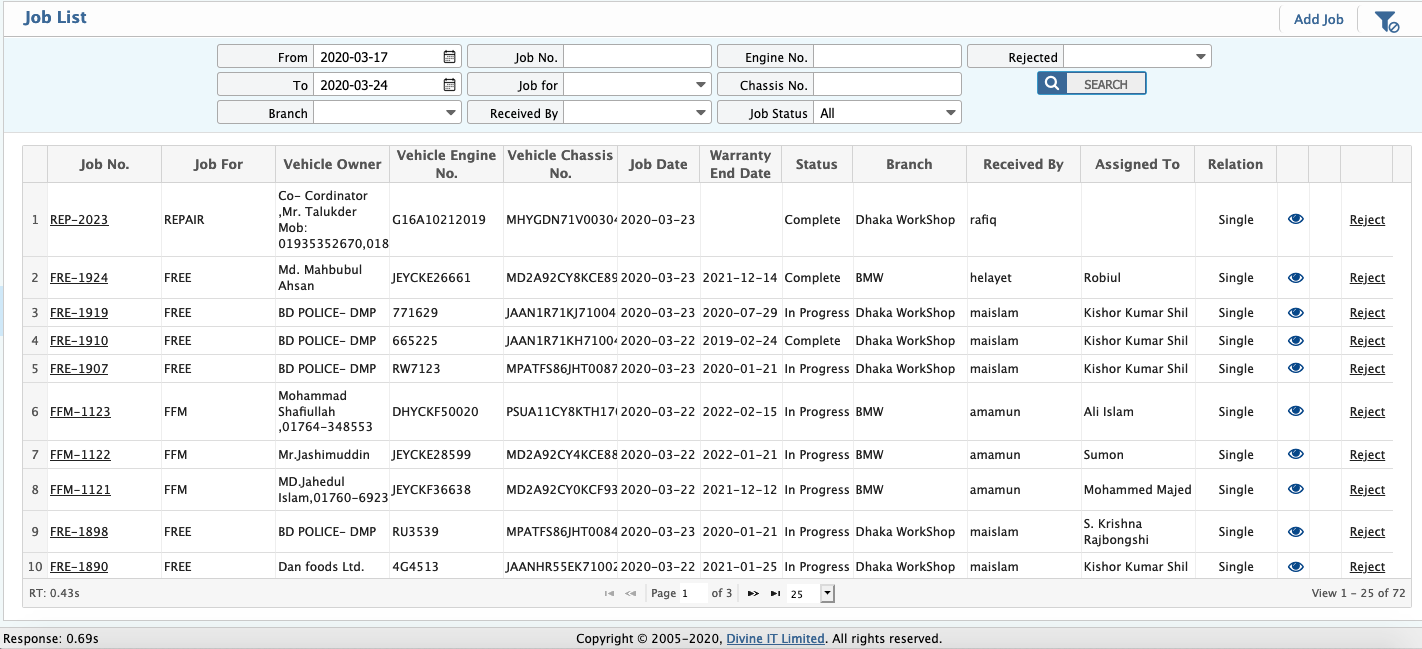
For detailed information of a job, click on the specific job number then you will see the below window.
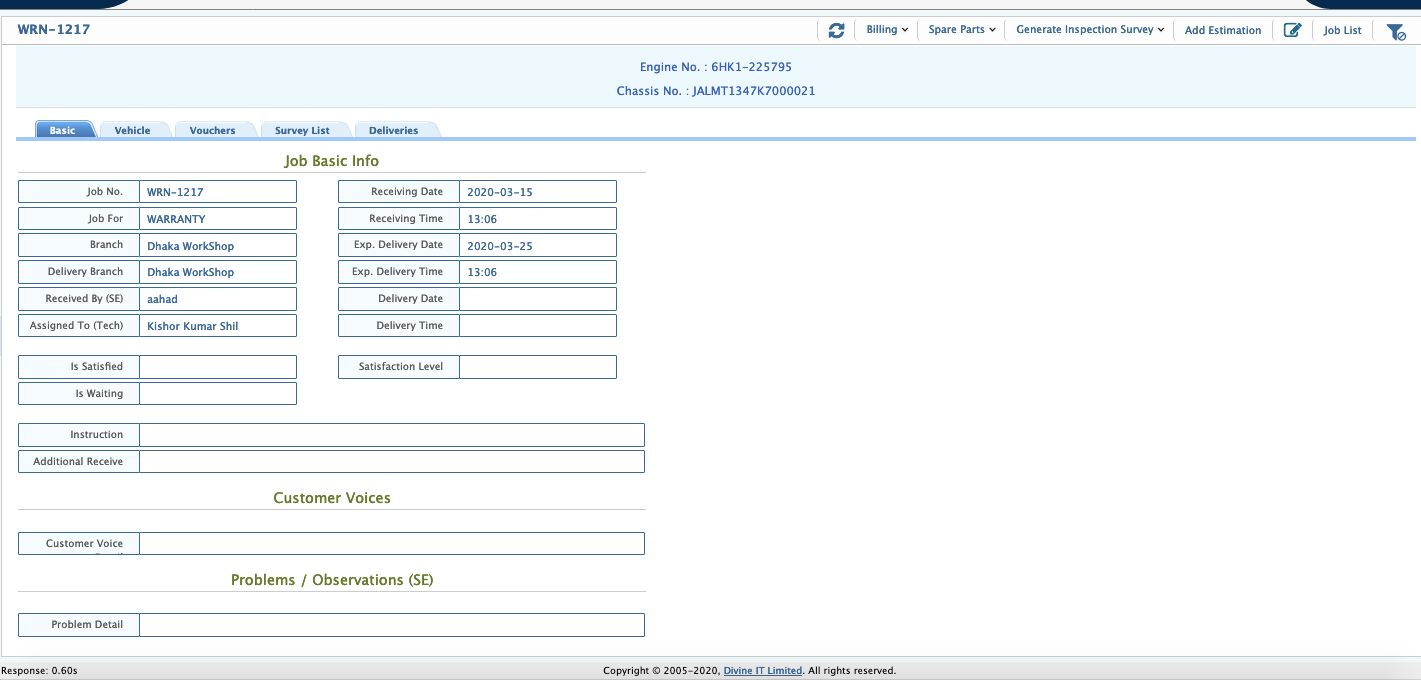
When you select a job from the list, you will see the detailed information of the job. From this page, you can manage and modify the job status and details. Below are the key actions you can take:
-
Edit Job Information:
You can edit any part of the job information by clicking on the Edit button. This allows you to update details such as job type, vehicle info, dates, technician assignment, and more. -
Generate Pre-Inspection & Post-Inspection Sheets:
If required, you can generate pre-inspection and post-inspection sheets. This can be done by clicking the Generate Inspection button. These documents help in tracking the condition of the vehicle before and after the job is completed. -
Change Job Status:
As the job progresses, you can update its status. Available statuses include:- In Progress: The job has started and is being worked on.
- Deliverable: The vehicle is ready for delivery but is pending final checks.
- Complete: The job has been finished.
- Closed: The job is fully completed, and all tasks related to the job are closed.
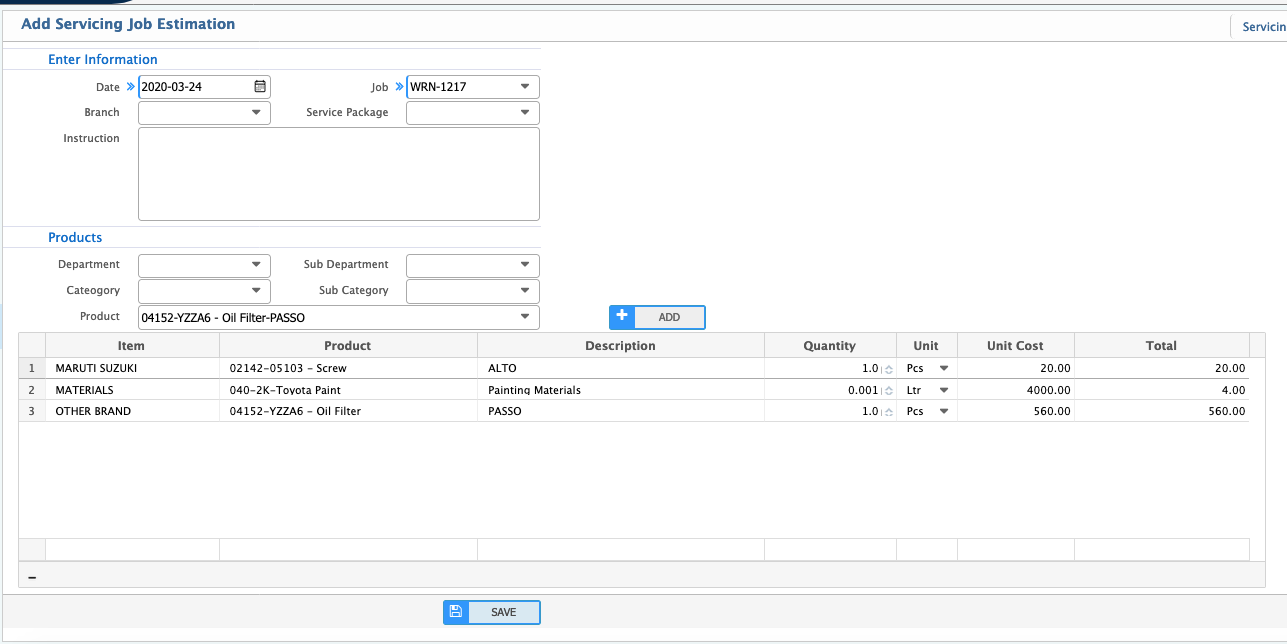
Add Estimation:
After adding a job, you need to estimate the required spare parts and labor charges to complete the job. Here's how you can manage the estimation process:
-
Add Estimation:
After adding a job, click on the Add Estimation button to start estimating the spare parts and labor costs needed for the job. This will open a window where you can input details like:- Spare Parts: List the parts needed for the job, their quantities, and prices.
- Labor Charges: Estimate the labor cost based on the time and skill required to complete the job.
-
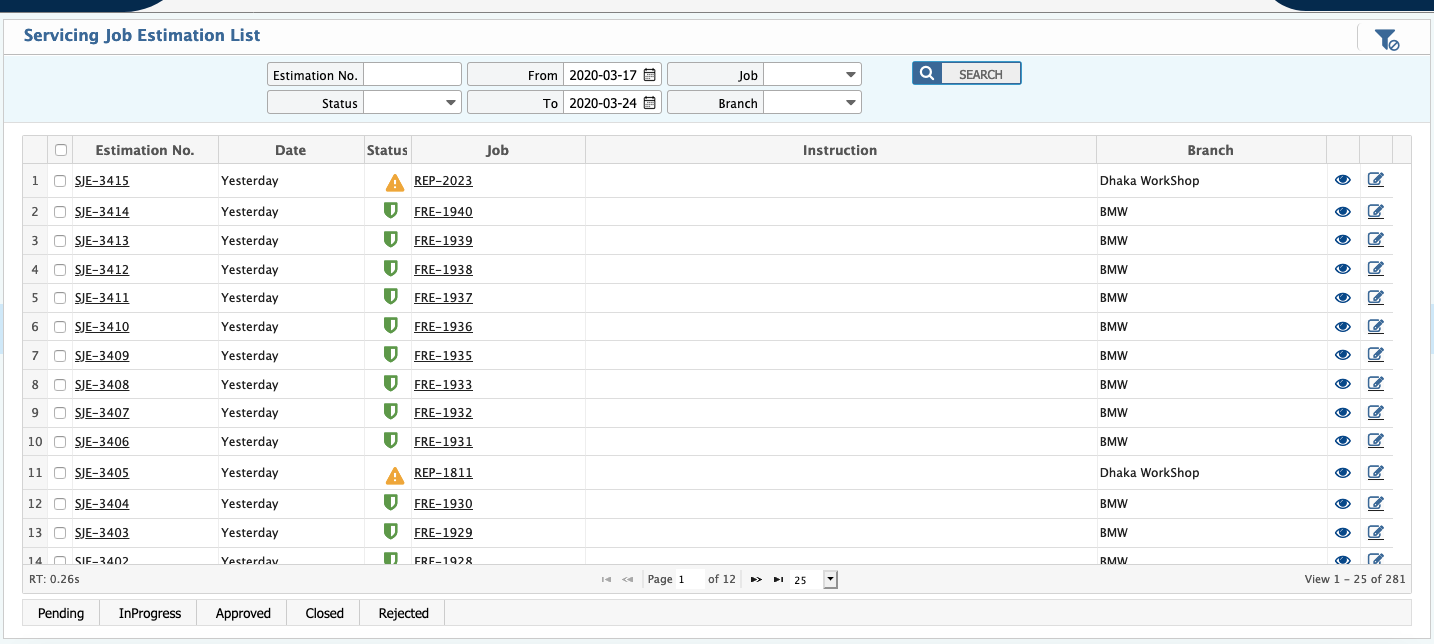
Approval of Estimation:
Once the estimation is added, it will appear in the list of estimations. From the list page, you can approve the estimation by selecting the appropriate action for approval. This ensures that the spare parts and labor charges are confirmed and ready for use in the job.
Estimation List:
To see the estimation list go to Estimation > Estimation List
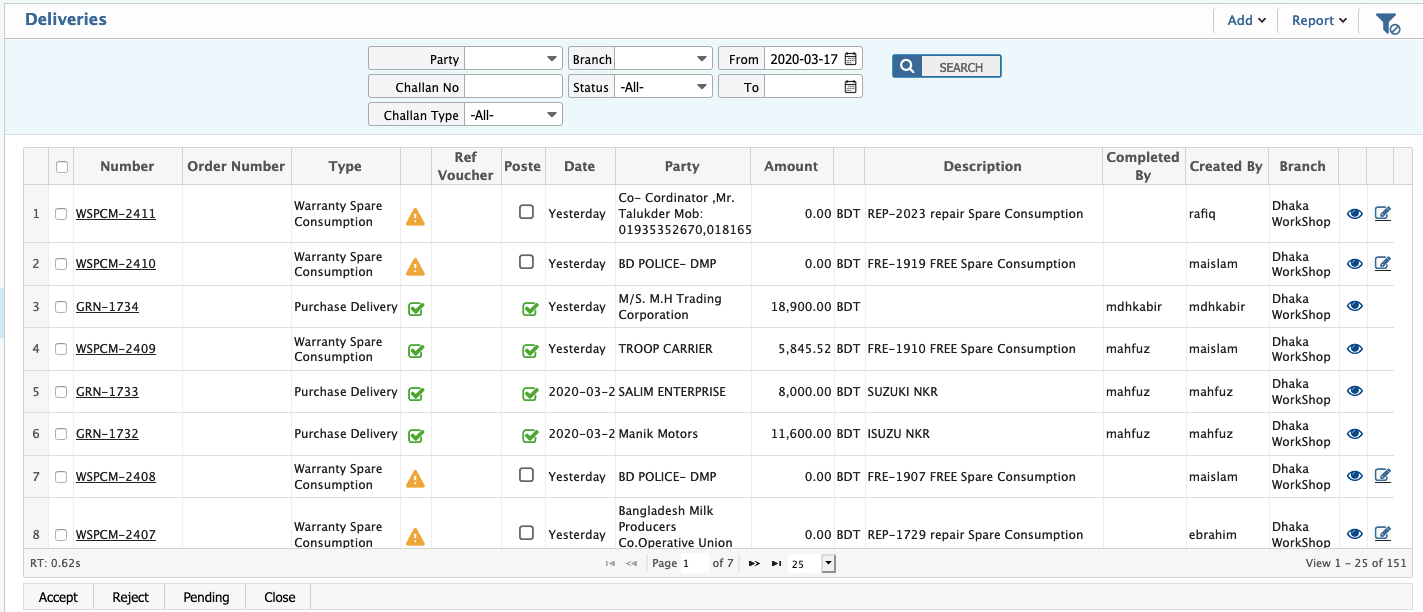
Spare Parts Consumption:
After job estimation, service engineers need to request the necessary spare parts from the store or warehouse. Here’s how the process works:

Sending Spare Parts Requisition:
After the job estimation is completed and spare parts have been estimated, the Service Engineer will click the Spare Parts Consume button from the estimation window. This action will create a requisition for the spare parts required for the job. The requisition will contain details such as:
- The parts needed
- Quantities and specifications
- Any additional information regarding the job
Requisition Approval:
Once the requisition is created, it will be sent to the Store Department for approval. The Store Department reviews the requisition and either approves or rejects it based on stock availability and other factors.
Spare Parts Consumption:
After the requisition is approved by the Store Department, the estimated spare parts will be consumed from the inventory/warehouse and allocated to the job. The system updates the inventory to reflect the consumption of parts against the job.
Spare Parts Consumption List:
To see the Spare Parts consumption/requisition list go to Deliver > Deliveries
Service Billing:
Once the job is completed by the service engineers, the Account Department needs to create a service bill for the customer. Here’s how the process works:
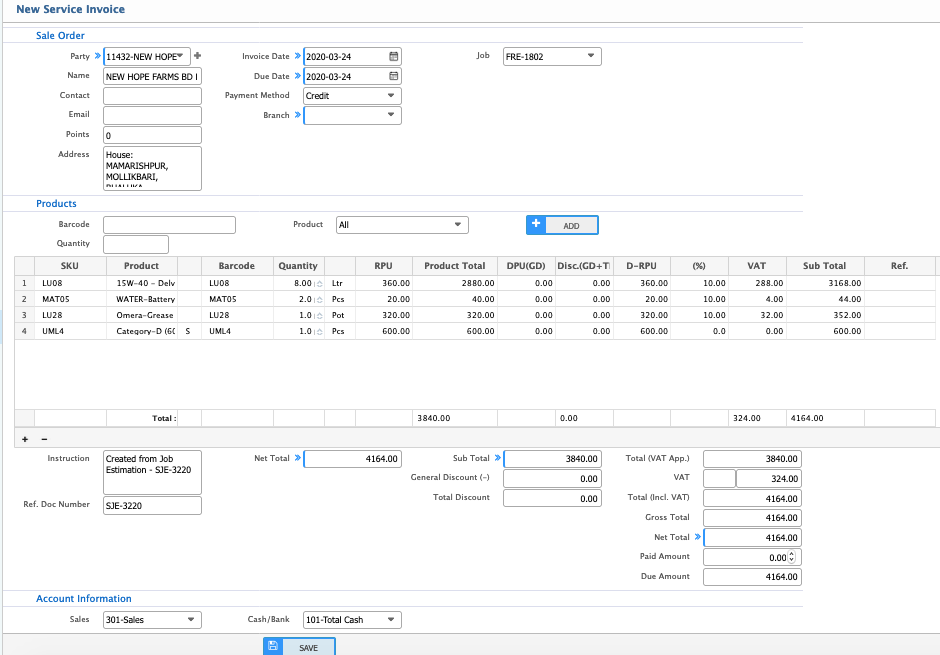
Create Service Bill:
The Account Department clicks on the Service Invoice button from the estimation window after the job has been completed. The system will automatically load the data related to the job and the estimation, including:
- Job details
- Spare parts used
- Labor charges
- Job reference number
- Estimation reference number
Apply Discounts:
If necessary, the account department can apply a discount to the customer. This can be done based on customer agreements or promotional offers. The discount can be a percentage or fixed amount, depending on the policy or arrangement.
Service Invoice Details:
The generated service invoice will include:
- Job and Estimation Reference Numbers: These will link the invoice to the job and estimation.
- Service Details: Information about the spare parts used, labor charges, and any other services rendered.
- Discount: Any discounts applied to the total amount.
- Total Amount: The final service amount after discount, including taxes (if applicable).
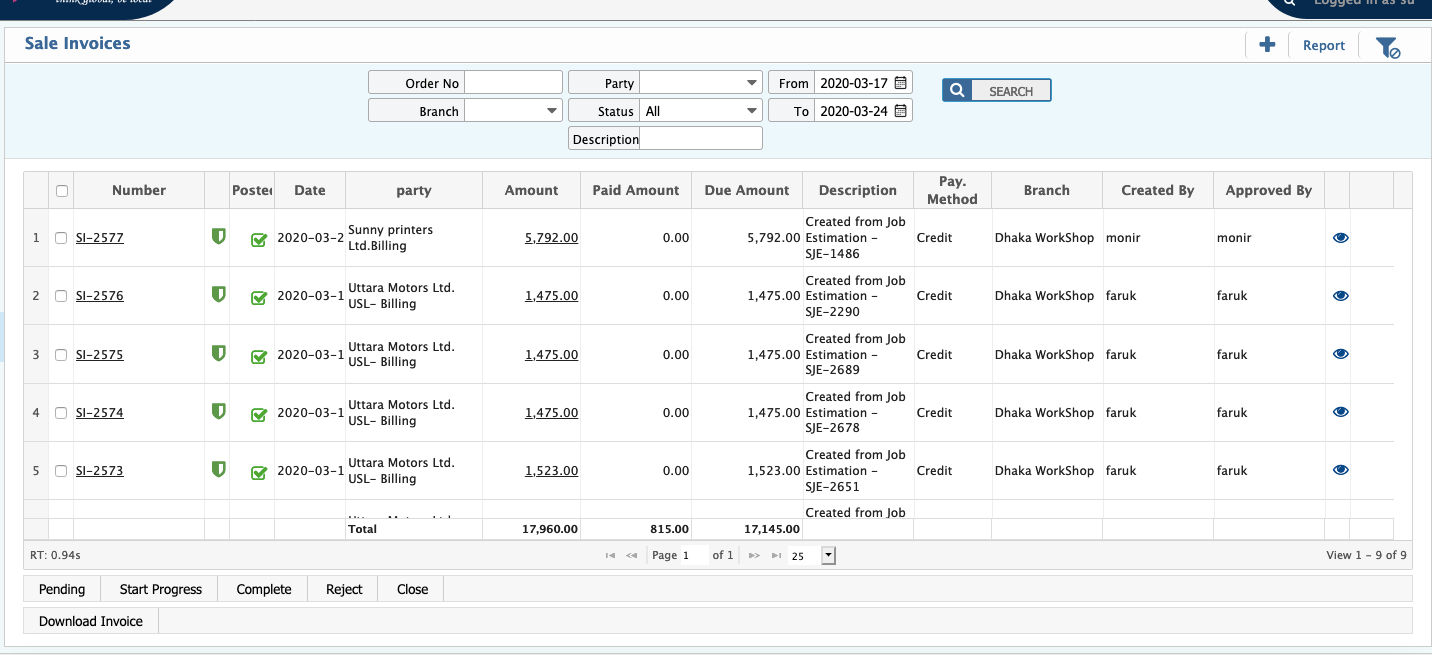
Bill List:
To see the bill list go to Sales > Sales Invoice > Sale Invoice List
Service Schedule:
Add New Servicing Schedules:
From the application you can also maintain and create Servicing Schedules. For creating a Servicing Schedule go to:
Vehicle Servicing > Servicing Schedules > New Servicing Schedules
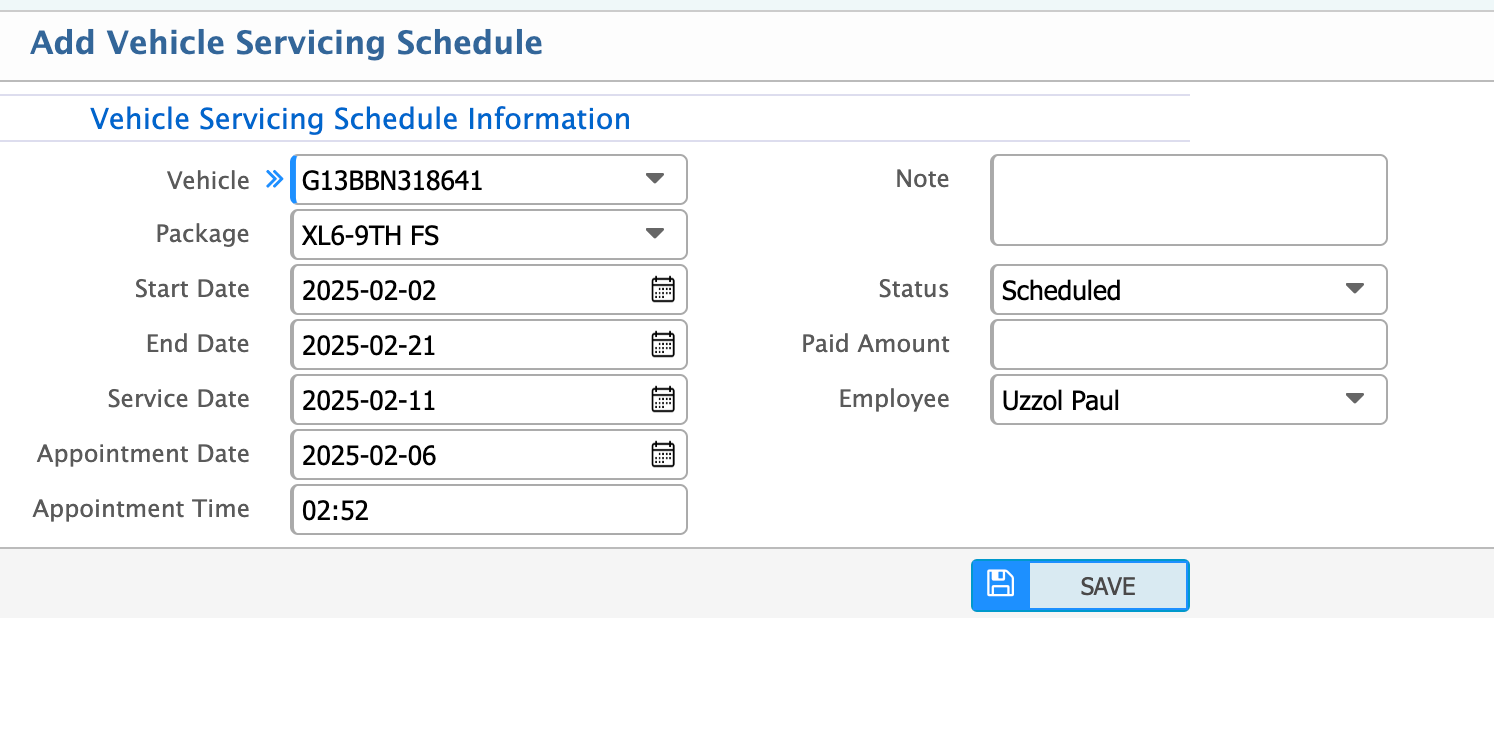
Here’s an overview of the key fields required when creating or updating a servicing schedule in the system:
- Vehicle: Add the Job item type for the vehicle being serviced.
- Package: Add Engine No. or Chassis No. for identification.
- Start Date: Add the Start Date for the service or maintenance work.
- End Date: Add the End Date to define the duration of the service.
- Service Date: Specify the Service Date when the service is expected to happen.
- Appointment Date: Enter the Appointment Date for scheduling the service.
- Appointment Time: Set the Appointment Time for when the service will take place.
- Status: Select the Status of the service from a dropdown menu (e.g., Pending, In Progress, Completed).
- Paid Amount: Enter the Paid Amount if the service has been paid for.
- Employee: Select the Employee (e.g., technician or service engineer) assigned to the service from a dropdown.
Servicing Schedule List:
To see the Schedule list, go to Vehicle Servicing > Servicing Schedules > Servicing Schedule List

In the Service Schedule List Page, the interface provides an organized view of all service schedules with the following features:
-
Top Section: Displays a list of all service schedules, showing:
- Engine No.
- Package
- Date
- Status of the service schedule (e.g., Pending, In Progress, Completed)
- The search filter allows you to search for specific schedules based on:
- Job Number
- Branch
- Status
-
Adding New Service Schedules:
You can add a new service schedule directly from the list page by clicking on the "+" icon located at the top right corner of the page, just beside the heading Service Schedule List. -
View Detailed Information:
To view more detailed information about a specific service schedule, simply click on the “eyeball icon” next to the schedule. This will open up the full details of that particular schedule. -
Bottom Section:
The bottom section of the page shows the detailed information for each service schedule, including specifics like the assigned technician, scheduled dates, job details, and service status. You can edit or modify the details of a specific schedule by clicking on the edit button at the right corner of any item in the list.