Support Ticketing System
A central system to answer all customers related tickets & support queries.
Solve any kind of customer or employer queries, complaints with multiple ticketing pathways through PrismERP support ticketing system, which provides a centralized system with automated ticket generating features.
Benefits
- Every Occurrence Notification
- Multiple Ticketing Pathways
- Improved Employee Service
- Support Ticket Analytics
- Support Collaboration
- 24/7 Support Service
- Easy Maintenance
Core Features
- Multi domain / Product Support
- Ticket Performance Monitoring
- SLA Based Ticketing
- Auto Assignment
- eMail to Ticket
Ticket Outline
(Custom Ticket Configuration)
The Ticket Outline module allows organizations to configure new types of tickets. Various options within this feature enable companies to view, add, edit, and configure tickets. It also allows configuring the email source, SPAM control, and custom customer response templates. (Note: A default ticket outline configuration is pre-set in the system, but users can customize it.)
How to Access the Ticket Outline Module
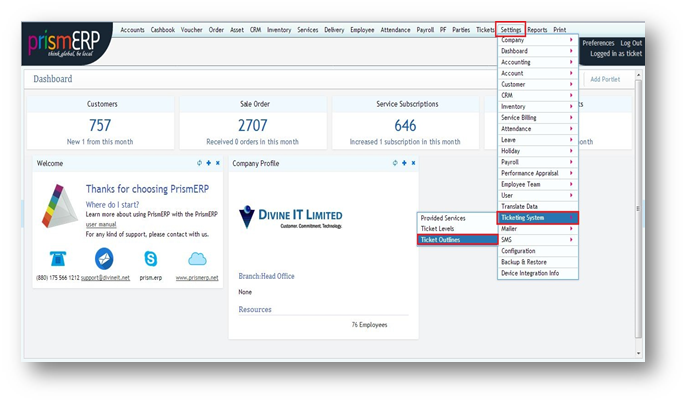
- Navigate to the Settings module in PrismERP.
- Select Ticketing System.
- Click on Ticket Outline.
How to Add a Ticket Outline

- Click the + icon at the top right corner.
- A window will appear where you can configure:
- Name – The heading for the new ticket type.
- Type – Defines different ticket categories (Support or Internal Ticket).
- Email Synchronization – Controls email handling and ticket visibility.
Email Sync
 Email Synchronization allows tracking emails related to tickets. Organizations can enable or disable this option.
- If Enabled, the system will:
- Last Sync – Display emails from a specific date to today.
- Email Selection – Choose the source email address for ticket replies.
- SPAM – Block specific email addresses by adding them to a blacklist.
Level Information
 The Level Information section enables organizations to assign ticket handling levels with automatic escalation after specific time intervals. For example:
- Level 1 handles the issue for one hour.
- If unresolved, it moves to Level 2.
- The process continues until resolution.
Email Templates
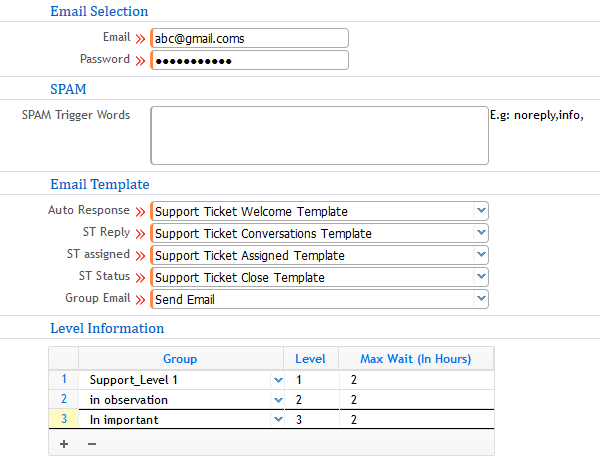 Predefined customizable email templates automatically respond to customers and assignees.
- Auto Response – Sends a welcome message with ticket details.
- ST Reply – Displays the current ticket status.
- ST Assigned – Notifies the assigned agent.
- ST Status – Indicates whether the ticket is Closed, Resolved, or Reopened.
Managing Service & Ticket Levels
1) Provided Service
 Organizations provide services to customers via ticketing. (Note: This is an optional feature available on request.)
To add a new Provided Service, users must configure:
- Service Name – The name of the service provider.
- Class – A category similar to the service name.
- Service ID – A unique code for easy identification.
- Service Group – The department or team handling specific service-related tickets.
2) Ticket Levels
 Ticket Levels define the hierarchy of employees responsible for handling tickets. Employees are assigned based on branch and department, ensuring an efficient workflow.
How to Access
- Navigate to Settings → Ticketing System → Ticket Levels.
How to Add a Ticket Level
- Click the add icon on the top-right of the Ticket Level List Page.
- Fill in the following details:
- Name – Ticket Level heading.
- Type – Support or Internal Ticket.
- Group Mail – Main email for all assigned employees.
- Department – Department responsible for handling tickets.
- Branch – The branch where the level is assigned.
- Agents Information – List of employees managing tickets.
- Set Status – Activate or deactivate the ticket level.
Ticket Levels List Page View
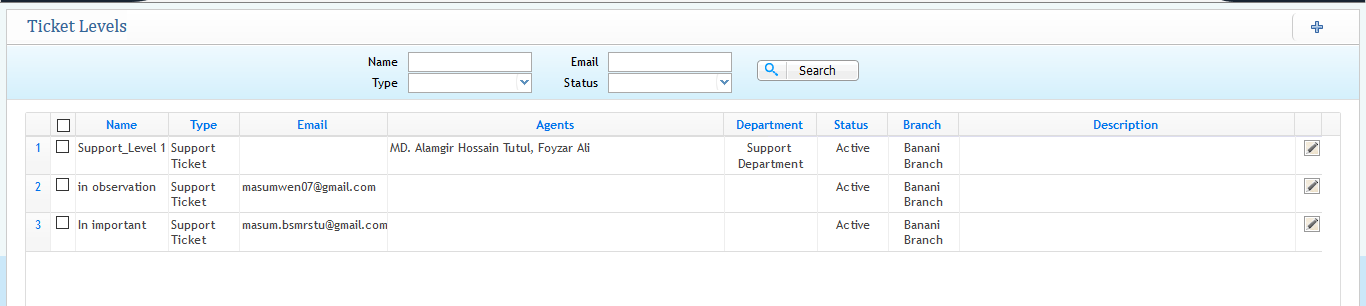 Users can:
- View, add, edit ticket levels.
- Activate or deactivate ticket levels.
Adding New Ticket & Portal Viewer
1) How to Add a New Ticket
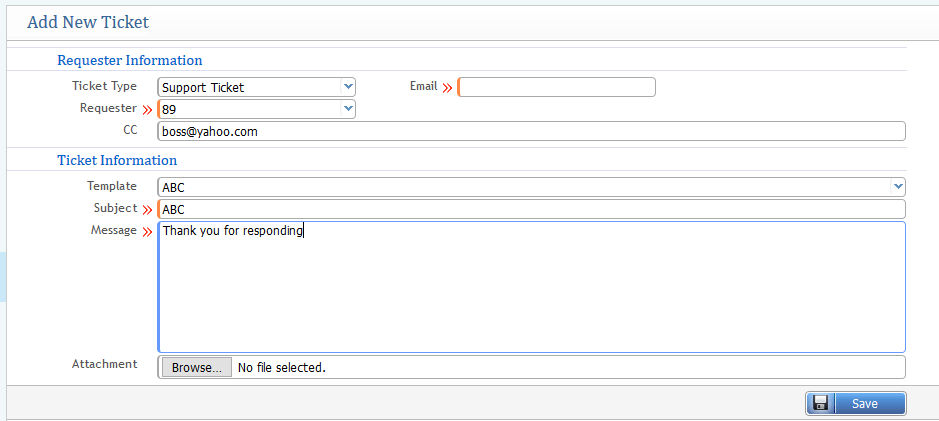
- Requester – Person generating the ticket.
- Email – A verified email in the system.
- Subject – A brief description of the issue.
- Message – A detailed problem description.
2) List Page View
The List Page provides an overview of all tickets, allowing users to:
- View, edit, and change ticket statuses.
- Filter tickets based on:
- Closed & Resolved Tickets
- Suspended List
- Ticket Numbers
- Assignee Information
- Requester
- Branch-wise Tickets
- Department & Level
- Party-based Tickets
- Issue Type
- Date Range
- Priority Levels
- Set Ticket Status
- Add New Tickets
3) Ticketing System Portal (How to Reply to a Ticket)
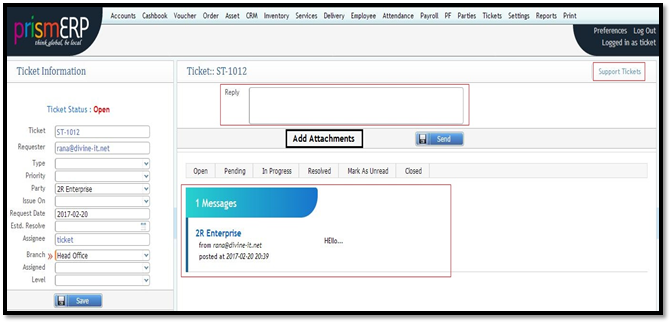 The Ticketing System Portal is the central hub where users manage ticket responses.
- Reply – View and respond to customer or agent messages.
- Add Attachment – Attach files to tickets.
- Ticket – Displays the ticket number.
- Type – Shows the issue type.
- Priority – Indicates urgency (Critical, Urgent, etc.).
- Issue On – Displays the subject of the raised ticket.
- Request Date – Date when the ticket was submitted.
- Branch – The branch handling the ticket.
- Level – Assigned level for managing and resolving the ticket.
Other features include tracking ticket status: Open, Pending, Solved, or Unsolved.
4) Customer Portal
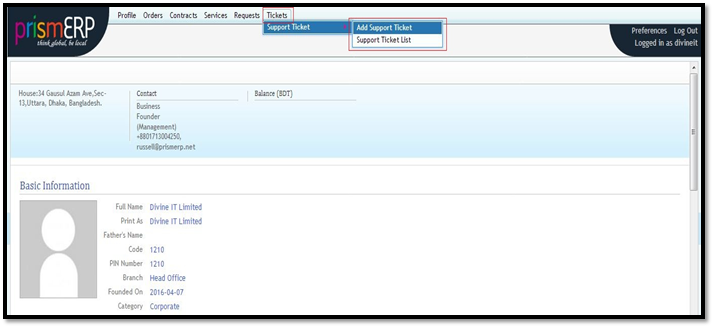 The Customer Portal allows customers to:
- Generate and submit new tickets.
- View ticket statuses and updates.
- Track issue resolution progress.
This interface improves customer interaction and transparency in the ticket resolution process.