Sales Commission
PrismERP's Sales Commission feature streamlines the process of generating commissions for salespeople based on specific sales or collection targets. Sales commissions are automatically calculated when salespeople meet their designated targets, ensuring accurate and timely rewards for their performance. Whether the targets are related to sales volume or collection amounts, PrismERP simplifies commission management, motivating employees and aligning their goals with business objectives.
Add Commission Plan
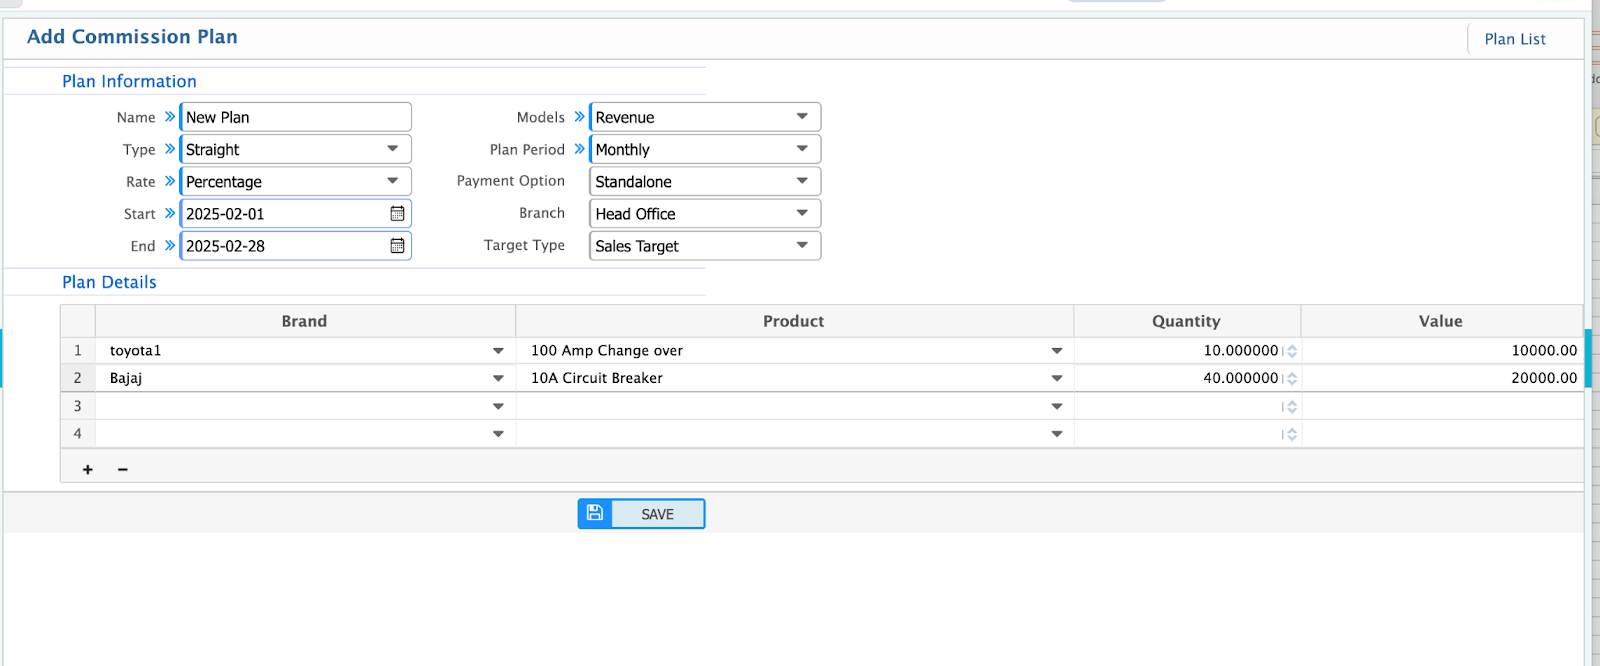
The Sales Commission Plan allows you to set up commission rules for employees based on sales or collection targets. It helps in defining commissions per product, quantity, or value. Here's how you can add and configure a sales commission plan in PrismERP:
Steps to Add a Sales Commission Plan
-
Navigate to Add Commission Plan.
-
Fill in the Following Fields:
General Information
- Name: Enter the name of the commission plan.
- Type: Choose the commission type:
- Straight: A fixed commission structure.
- Graduated: Commission based on achieving incremental milestones.
- Rate: Select how the rate will be applied:
- Flat Amount: A fixed monetary value.
- Percentage: A percentage of sales or collections.
- Model: Choose the model to calculate the commission:
- Revenue: Based on total revenue.
- Gross Margin: Based on profit margin.
- Plan Period: Select the time period for the plan:
- Monthly, Quarterly, Half-Yearly, or Yearly.
- Payment Option: Decide how the commission will be paid:
- Standalone: As a separate payment.
- With Salary: Combined with the employee’s salary.
- Branch: Assign the plan to a specific branch.
Target Information
-
Target Type: Choose between:
- Sales Target:
- Fill in the plan details:
- Product Name
- Quantity
- Commission Value
- Commission can be calculated as an amount or percentage.
- Fill in the plan details:
- Collection Target:
- Fill in the plan details:
- Customer/Party
- Collection Amount
- Commission (Amount/Percentage)
- Fill in the plan details:
- Sales Target:
-
Plan Duration:
- Start Date: Enter the starting date of the plan.
- End Date: Enter the ending date of the plan.
Add Plan if Target Type Sales Target
Add Plan if Target Type Collection Target

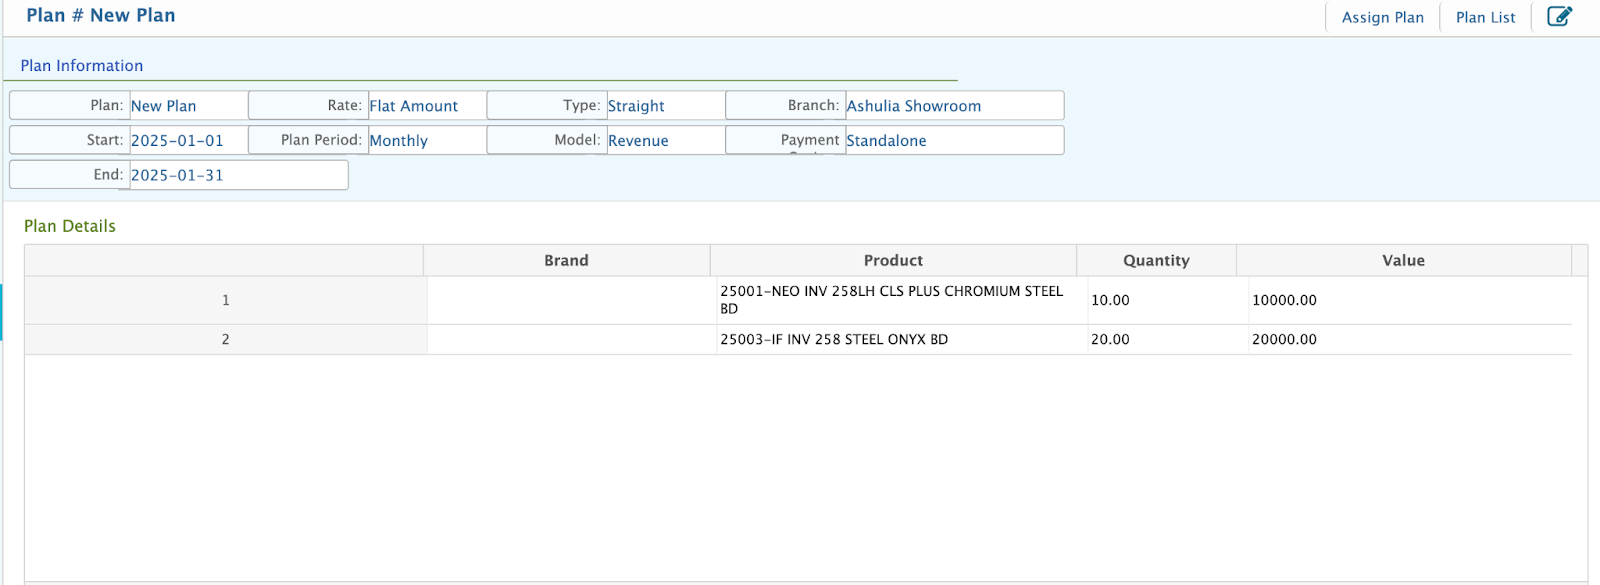
Sales Commission Plan List
The list page shows all the sales commission plan lists that are being created in the application.

You can manage and review existing commission plans easily by utilizing the features on the list page.
Search Options
You can search for specific commission plans by the following criteria:
- Name: Search by the name of the commission plan.
- Rate: Filter based on whether the rate is a Flat Amount or Percentage.
- Branch: Search by the branch associated with the plan.
- Plan Period: Filter by plan duration (Monthly, Quarterly, Half-Yearly, or Yearly).
- Start Date: Find plans based on the starting date.
- End Date: Find plans based on the ending date.
View Plan Details
To view the detailed information of a plan, click on the Plan Name in the list. This will display all the details, such as targets, rates, and payment options.
Edit a Plan
If changes are needed, click on the Edit button next to the desired plan. Make the necessary updates and save the plan.
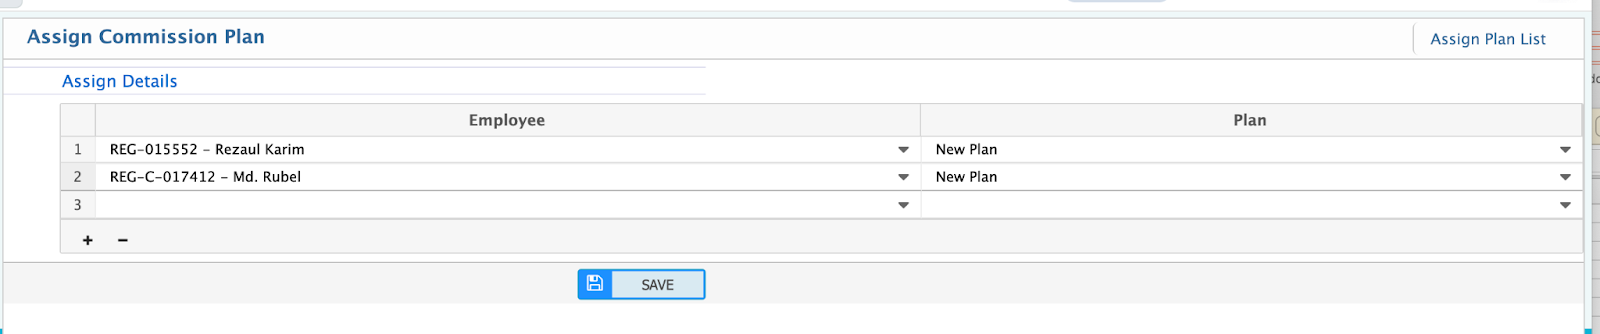
Assign Commission Plan
After creating a sales commission plan, the next step is to assign employees to the respective plan. Follow these steps to assign employees:
Steps to Assign Commission
-
Navigate to the Assignment Section: Go to Sales → Sales Commission → Assign Commission Plan.
-
Fill Up the Following Fields:
- Employee: Select the employee who will be covered under the commission plan.
- Plan: Choose the sales commission plan that is to be assigned to the selected employee.
Saving the Assignment
After filling in the required details, click Save to finalize the assignment.
Commission Plan Assign List
The list page shows all the sales commission plan assign lists that are being created in the application.

Once employees are assigned to specific sales commission plans, you can manage and review these assignments from the list page.
Features on the List Page

- Search and Filter: You can filter the list by Plan Name or Employee for quick access to specific assignments.
- View Details: To see the complete details of an assigned plan, click on the Plan Name. This will display all the associated details of the assignment.
- Edit Assignments: If updates are required, click on the Edit Button next to the respective assignment to modify the details.
Generate Payment
After assigning employees to a commission plan, the next step is to generate payment based on the plan configuration. Follow these steps to generate payments:
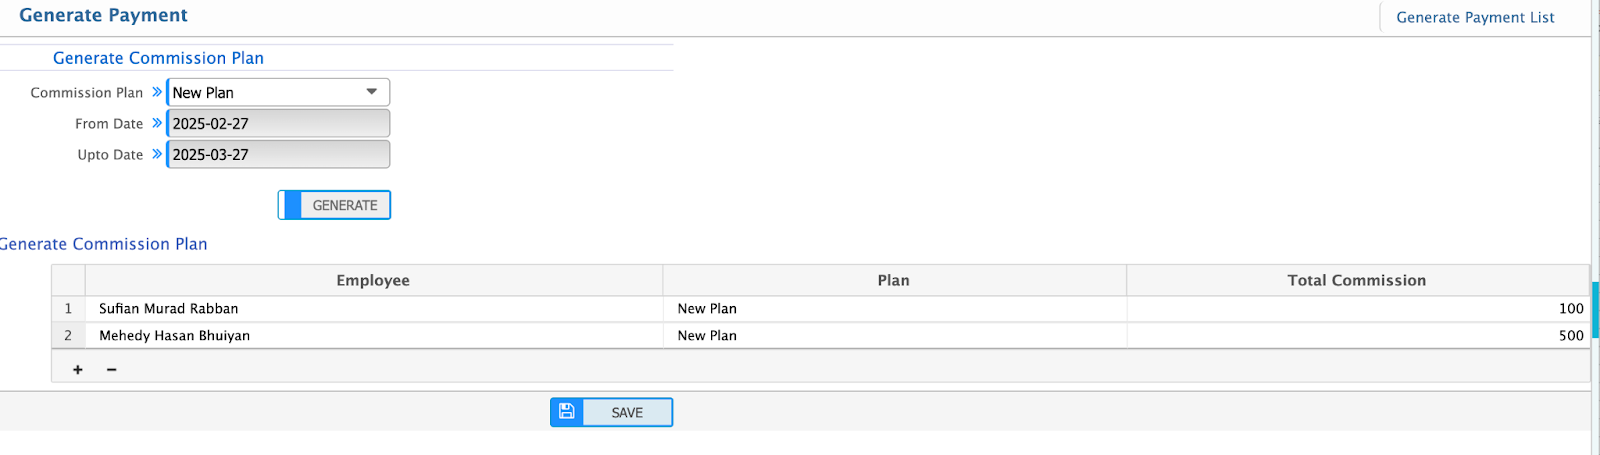
Steps to Generate Payment:
- Select Plan: Navigate to the Sales Commission Payment Generation page and choose the desired commission plan.
- Date Range: The From Date and To Date fields will automatically load based on the configuration of the selected plan.
- Generate Payment: Click the Generate Button. The system will process the payment details, and the following information will be auto-generated:
- Employee Name: The employee associated with the plan.
- Plan Name: The specific sales commission plan applied.
- Commission Amount: Calculated according to the setup in the plan.
Key Highlights:
- The generation process ensures that all calculations align with the pre-configured commission settings.
- This method eliminates manual calculations, reducing errors and saving time.
Payment List

The list page shows all the payment lists that are being created in the application.
After generating payments, you can review the details and proceed with creating payment vouchers for employees. Here's how to manage this process:
Features of the List Page:
- Filtering Options: You can filter by Plan Name and Status to narrow down the list to specific plans or employees.
- Displayed Information: The list page shows:
- Employee Name: The employee receiving the commission.
- Plan Name: The associated commission plan.
- From Date & To Date: The time frame for the commission calculation.
- Total Commission: The total calculated commission amount for the employee.
Add Voucher for Payment:
To process the commission payment, click the Add Voucher button next to the desired entry. This action will initiate the creation of a voucher, enabling payment disbursement to the employee.
Add Voucher

After adding a voucher, you can proceed with payment processing through the system. The voucher details will be stored for record-keeping and reporting purposes.