Cheque Book Management
The PrismERP Cheque Management feature makes it easy to handle all cheque-related operations in one place. It covers adding new cheque books, issuing cheques, recording payments, and receiving cheques. With PrismERP, users can track cheque status, link cheques to vouchers or sales orders, and maintain detailed records. Search, filter, and reporting tools help users monitor cheque activities and generate reports like General Report, Monthly Money Receipt, and Accountant View.
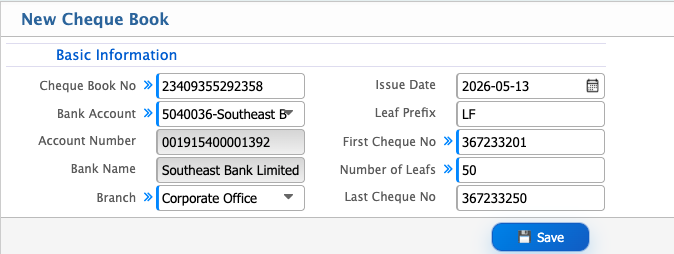
Add New Cheque Book
| Field | Description / Action |
|---|---|
| Cheque Book No | Enter the unique number or ID for this cheque book. |
| Bank Account | Select the bank account linked to this cheque book. |
| Account Number | Enter the account number associated with the cheque book. |
| Bank Name | Enter or select the bank’s name. |
| Issue Date | Enter the date the cheque book is issued. |
| Leaf Prefix | Specify the prefix used on cheque leaves (if any). |
| First Cheque No | Enter the number of the first cheque in the book. |
| Number of Leafs | Enter the total number of cheque leaves in this book. |
| Last Cheque No | Enter the number of the last cheque in the book. |
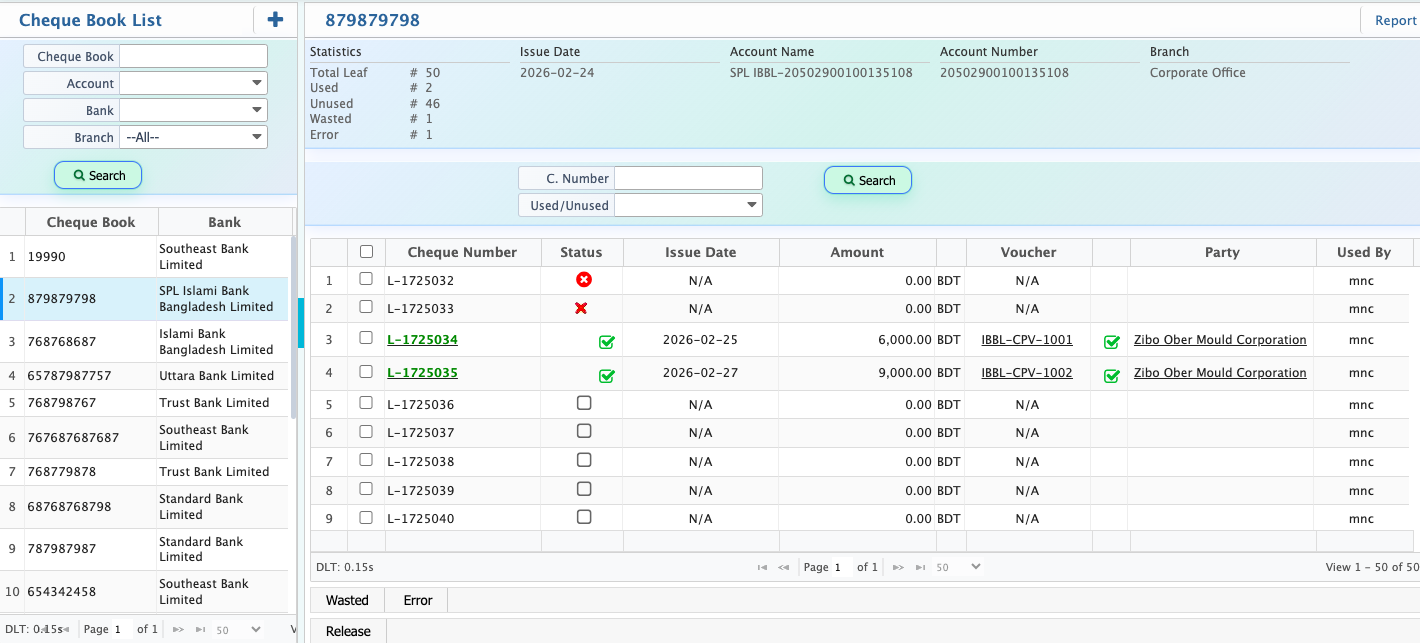
Cheque Book management in PrismERP allows users to search, filter, and view cheque book information in an organized way. Users can search by full or partial cheque book number and filter by bank name, branch, or account number. In the Cheque Book Details view, users can check and update the status, and view full cheque-related information such as bank, branch, account details, issue date, cheque numbers, voucher reference, related party, and user information.
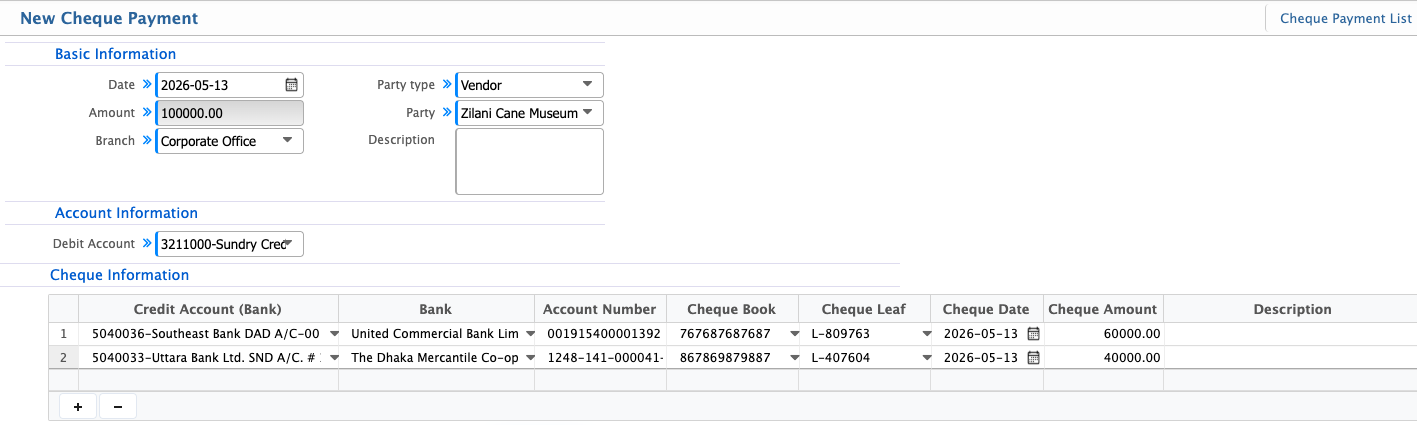
Cheque Payment
| Field | Action |
|---|---|
| Date | Enter the date of the cheque payment. |
| Party Type | Select the type of party (Vendor, Customer, Employee, etc.). |
| Party | Choose the party receiving the payment. |
| Branch | Select the branch. |
| Description | Enter a note or purpose for the payment. |
| Debit Account | Select the account from which the payment is deducted. |
| Credit Account (Bank) | Select the bank account to issue the cheque from. |
| Bank | Select the bank linked to the cheque. |
| Account Number | Enter the bank account number. |
| Cheque Book | Select the cheque book to use for this payment. |
| Cheque Leaf | Choose the specific cheque leaf number. |
| Cheque Date | Enter the date written on the cheque. |
| Cheque Amount | Enter the cheque amount. |
| Project | Link the payment to a project if applicable. |
| Description | Add extra notes regarding the cheque. |
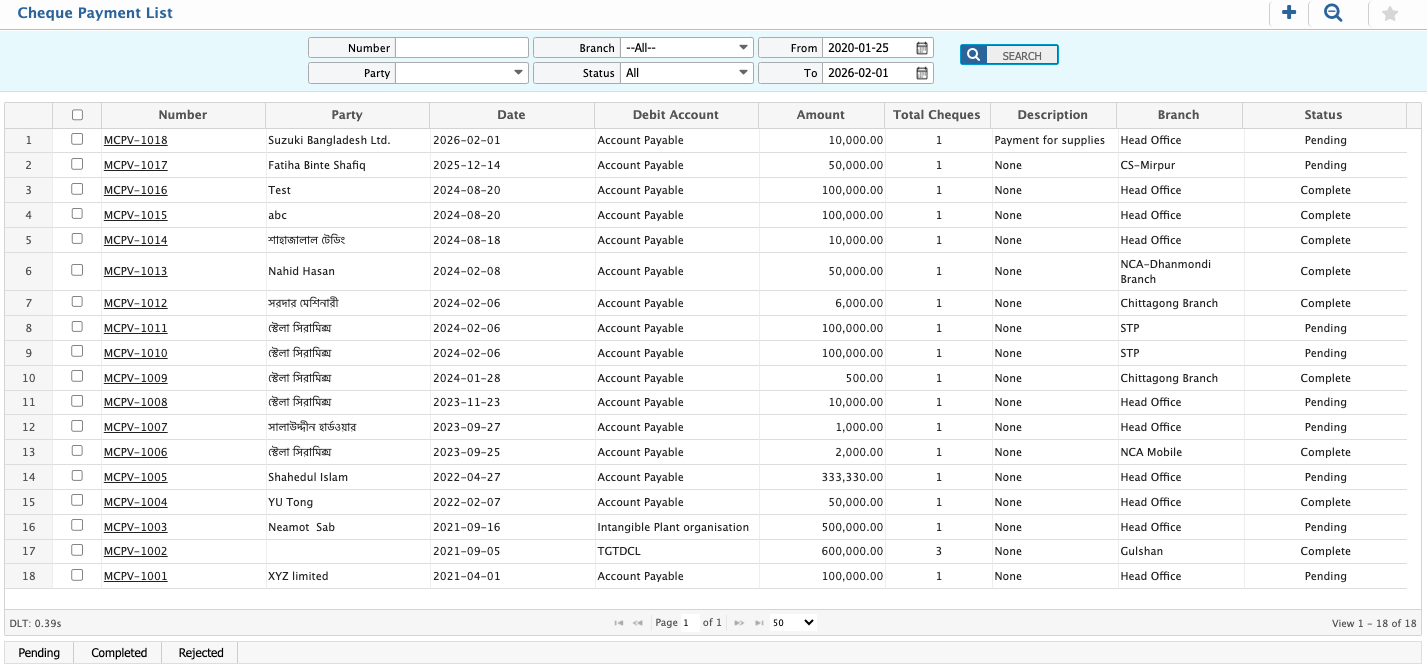
After adding a cheque payment in PrismERP, the record becomes available in the Cheque Payment List. From this list, users can search and filter entries by party, date, bank, or cheque number. Users can also update the status as pending, completed, or rejected. Clicking the cheque payment number opens the Cheque Payment Details view, where users can see full details and approve or reject the voucher.
Issued Cheques
Issued Cheques in PrismERP are managed through a searchable and filterable list where users can find records using voucher number, cheque number, party, bank, branch, status, and date range. Reports can be generated in different formats, and purchase orders can be linked when needed.
When an issued cheque is opened, it leads to the Issued Cheque Details view. This view shows complete information including general details, accounting view, attachments, cheque details, and history of all actions. It also includes tabs like general view, accountant view, attachments, cheque view, and cheque history for structured tracking and review.