Employee Addition
In PrismERP, users can add a new employee from the HCM module. This action allows entering all relevant information to create a complete employee record, including identity, contact details, employment data, banking information, emergency contacts, and department assignments. Once all fields are completed and Save is clicked, the new employee appears in the Employee List for immediate access.
Users can search and filter employees by branch, designation, department, or employment type to quickly locate a specific record. The system also supports adding multiple employees at once and batch editing existing records. Additional features include sending signup emails, exporting card information, generating reports, and importing training records, ensuring that employee information is complete, organized, and ready for further management.
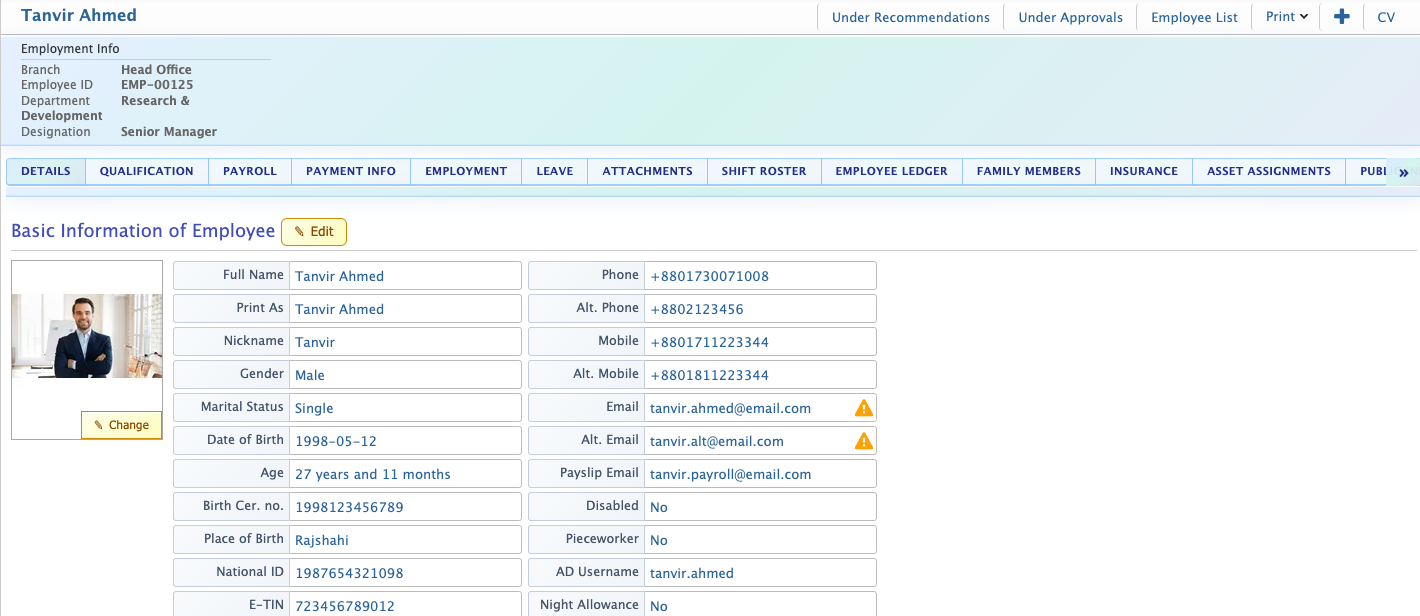
Clicking on a newly added employee opens the Detail View, where users can manage all aspects of the employee’s profile, including qualifications, payroll, leave, ledgers, insurance, assigned assets, and public information. Users can update, track, and print the full employee profile whenever needed.
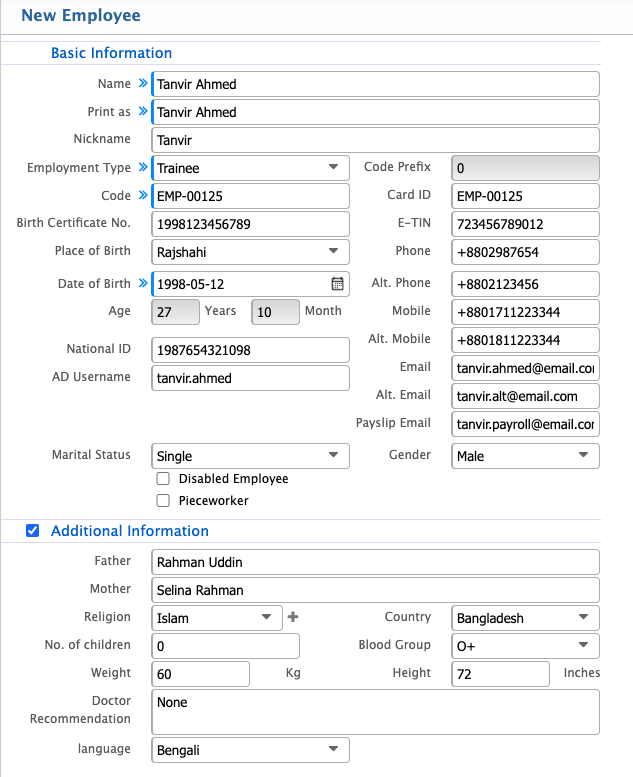
Add New Employee
| Field | Action |
|---|---|
| Name | Enter the employee’s full official name as per legal or organizational records. |
| Nickname | Enter a short or familiar name for internal or informal use. |
| Employment Type | Select the employment type such as Intern, Permanent, or Contractual. |
| Code | Enter or auto-generate a unique employee identification code. |
| Birth Certificate No. | Enter the official birth certificate number for record-keeping purposes. |
| E-TIN | Enter the employee’s electronic tax identification number if applicable. |
| Place of Birth | Enter the employee’s place of birth as per official documents. |
| Phone | Enter the primary contact phone number of the employee. |
| Date of Birth | Select the employee’s date of birth from the calendar. |
| National ID | Enter the employee’s national identification number. |
| AD Username | Enter the Active Directory username if system login integration is used. |
| Alt. Phone | Enter an alternative phone number for additional contact. |
| Mobile | Enter the employee’s primary mobile number for communication. |
| Alt. Mobile | Enter an alternative mobile number if available. |
| Enter the primary email address of the employee. | |
| Alt. Email | Enter an alternative email address for backup communication. |
| Payslip Email | Enter the email address where payslips will be sent regularly. |
| Marital Status | Select the employee’s marital status from the available options. |
| Gender | Select the employee’s gender from the available options. |
| Father | Enter father’s full name. |
| Mother | Enter mother’s full name. |
| Religion | Select the Religion of the employee |
| Country | Select the residing country of the employee |
| Blood Group | Select the blood group . |
| Number of Children | Enter a number of children if any. |
| Weight & Height | Enter weight and height information if applicable. |
| Doctor Recommendation | Enter if there is any doctor recommendation for this employee. |
| Language | Select the language of the employee. |
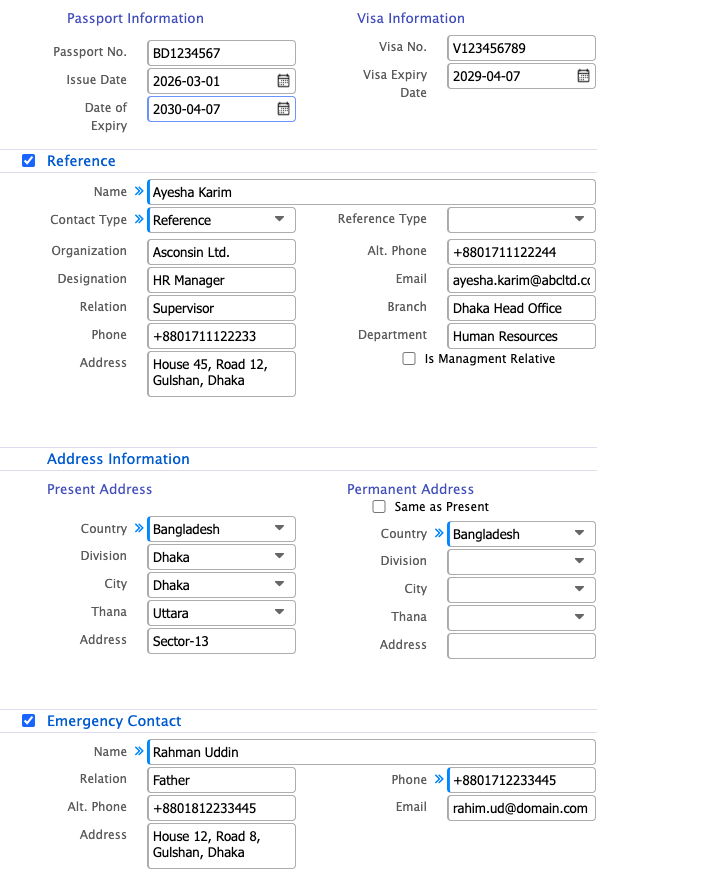
| Reference | Enter any reference details such as referral source or recommending person details. |
| Present Address-Country | Select the country where the employee currently resides (e.g., Bangladesh). |
| Present Address-Division | Select the administrative division of the present address. |
| Present Address-City | Select the city corresponding to the present address. |
| Present Address-Thana | Select the thana or upazila of the present address. |
| Present Address-Address | Enter the complete present address with necessary details. |
| Permanent Address | Enable this option to automatically copy the present address into permanent address fields. If different fill in the fields separately.. |
| Emergency Contact-Name | Enter the full name of the emergency contact person. |
| Emergency Contact-contact | Enter the relationship of the contact person with the employee. |
| Emergency Contact-phone | Enter the primary phone number of the emergency contact. |
| Emergency Contact-alternate phone | Enter an alternative phone number if available. |
| Emergency Contact-email | Enter the email address of the emergency contact person. |
| Emergency Contact-address | Enter the complete address of the emergency contact. |
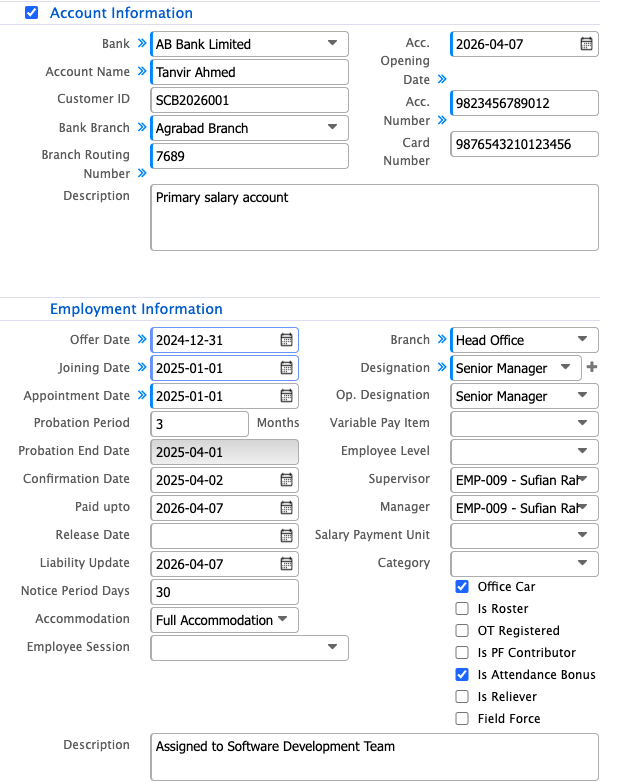
| Bank | Select the bank where the employee holds an account. |
| Account Name | Enter the account holder’s name as registered with the bank. |
| Customer ID | Enter the bank’s customer identification number if applicable. |
| Bank Branch | Select the specific branch of the bank. |
| Branch Routing Number | Enter the official routing number of the selected bank branch. |
| Acc. Opening Date | Select the date when the bank account was opened. |
| Acc. Number | Enter the bank account number accurately. |
| Card Number | Enter the associated debit or credit card number if required. |
| Description | Enter any additional notes or remarks related to the account. |
| Offer Date | Select the date when the employment offer was issued. |
| Joining Date | Select the employee’s official joining date in the organization. |
| Appointment Date | Select the formal appointment date as per company records. |
| Probation Period | Enter the duration of the probation period in months. |
| Probation End Date | Select or verify the calculated end date of the probation period. |
| Confirmation Date | Select the date when the employee is confirmed as permanent. |
| Paid upto | Select the date up to which salary has been processed if applicable. |
| Release Date | Select the employee’s release or exit date if applicable. |
| Liability Update | Select the date when any liabilities were last updated. |
| Notice Period Days | Enter the required notice period duration in days. |
| Accommodation | Select accommodation or housing benefits assigned to the employee. |
| Employee Session | Select the applicable employee session or working cycle. |
| Branch | Select the branch where the employee is assigned. |
| Designation | Select the official job designation of the employee. |
| Op. Designation | Select the operational designation if it differs from the official one. |
| Variable Pay Item | Select applicable variable pay components such as bonuses or incentives. |
| Employee Level | Select the employee’s level within the organizational hierarchy. |
| Supervisor | Select the immediate supervisor responsible for the employee. |
| Manager | Select the reporting manager overseeing the employee. |
| Salary Payment Unit | Select the unit responsible for processing salary payments. |
| Category | Select the category of employment such as permanent or contractual. |
| Description | Enter any additional remarks or notes related to employment details. |
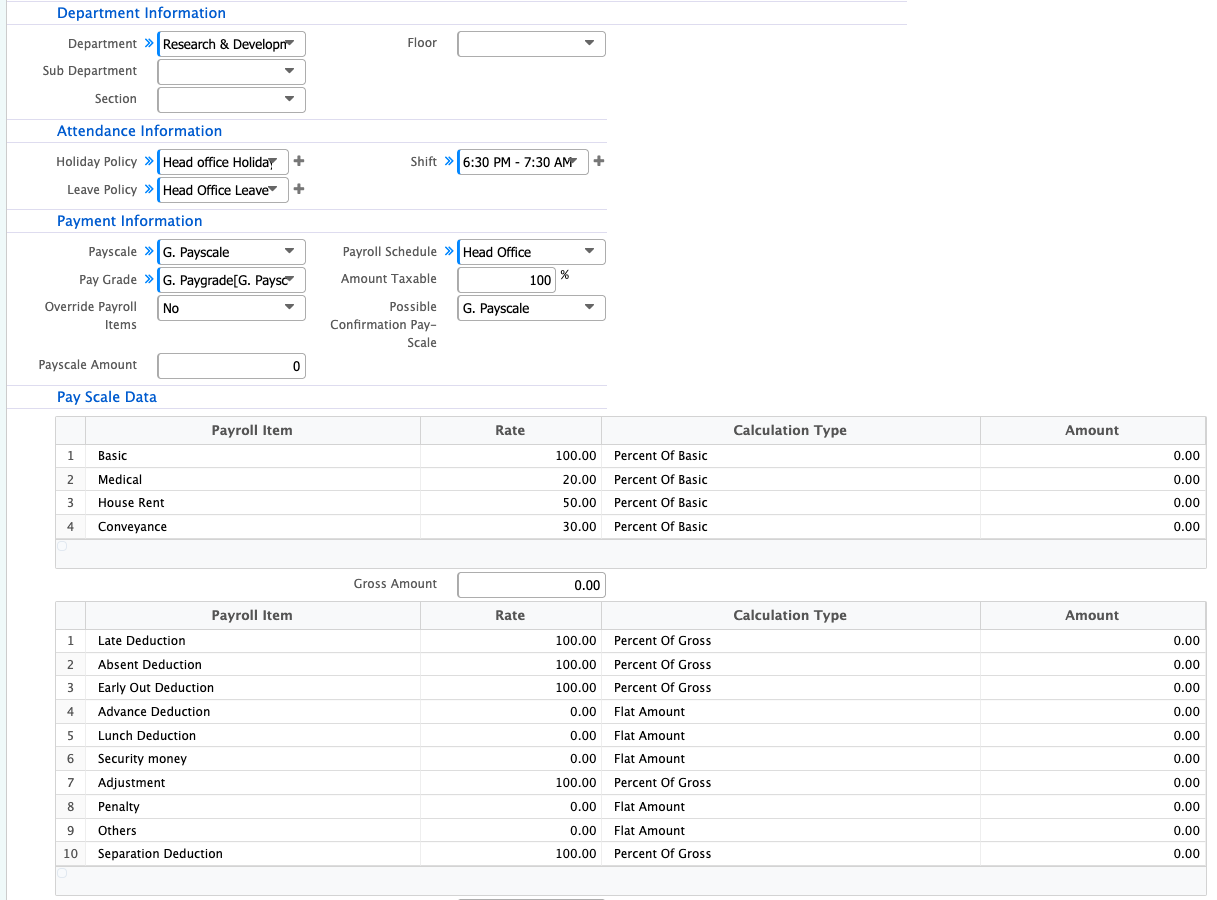
| Department | Select the main department where the employee is assigned. |
| Sub Department | Select the specific sub-division under the main department. |
| Section | Select the section or unit within the department. |
| Floor | Select the physical floor or location of the employee’s workspace. |
| Holiday Policy | Select the holiday policy applicable to the employee. |
| Head Office Holiday | Enable if head office holiday rules apply to the employee. |
| Leave Policy | Select the leave policy assigned to the employee. |
| Head Office Leave Policy | Enable if head office leave policy is applicable. |
| Shift | Select the working shift schedule assigned to the employee. |
| Payscale | Select the applicable payscale structure for the employee. |
| Pay Grade | Select the corresponding pay grade within the payscale. |
| Override Payroll Items | Enable or disable manual override of default payroll components. |
| Payroll Schedule | Select the schedule for salary processing such as monthly or bi-weekly. |
| Amount Taxable | Enter the percentage or amount of income that is subject to taxation. |
| % Possible Confirmation Pay-Scale | Enter the percentage of salary applicable after confirmation. |
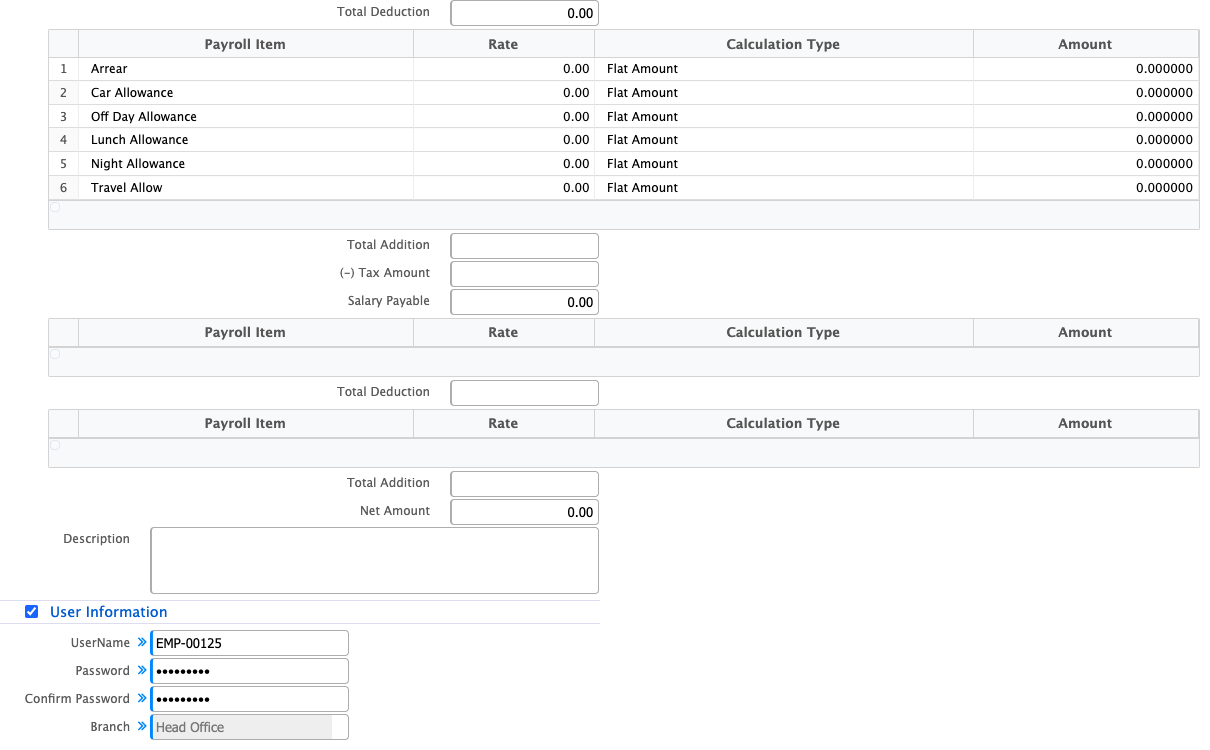
| User Information | Set up user account details to enable system access for the employee if required. |
After entering all employee information and clicking Save, the newly created employee will appear in the Employee List. Users can search and filter using different criteria such as branch, designation, department, or employment type to quickly find the employee they need. The module also supports adding multiple employees at once and batch editing existing records, making it easier to manage larger teams. Users can send signup emails to provide system access, export card information for administrative use, generate reports for analysis, and import employee training records to maintain a complete profile of employee development.

Clicking on an employee’s name opens their Detail View, where users can manage all aspects of the employee’s profile. This includes personal information, qualifications, payroll details, leave records, ledgers, insurance information, assigned assets, and public information. Users can update, review, and track all employee-related activities in one centralized location, and they can also print the full employee profile whenever needed.