PF Accounting Management
1) Accounts:
Chart of accounts shows complete list of all accounts for a company or an organization to define each class of items for which money or equivalent is spent or received. In order to see all the accounts list in chart of accounts, first you need to create all the accounts required and relevant to your PF Accounting.
- How to create an account in the application?
Solution:
In PrismERP, Financial Accounting is the major solution of overall application as it relates to all the financial transaction and business related operations. In order to maintain all the business accounts, first create the type of accounts required for your company or organization.
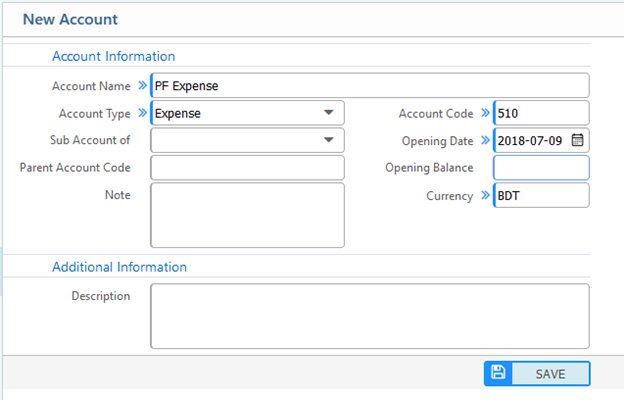
For creating a new account go to: Settings--> Accounting---> New Account
The above window will appear after selecting the new account:
1) Account Name: Name of the account
2) Account Type: Type of account whether it is asset, liability equity, expense, income etc.
3) Sub Account: If you want to provide this account as a sub account of any other account
4) Account Code: Following the International Standad of account providing the code or if you want to customize a code in your own style for identifying the account with a code
5) Opening Date: Date of Opening the Account
6) Opening Balance: Opening Balance if you want to provide any for the new account
7) Branch: Under which branch account is created (Note that it is only possible when you are creating the account which will be a sub account of another account)
- Creating New Cash Account:
Creating all the accounts related to cash for your organization.
Settings--> Accounting--> New Cash Accounts
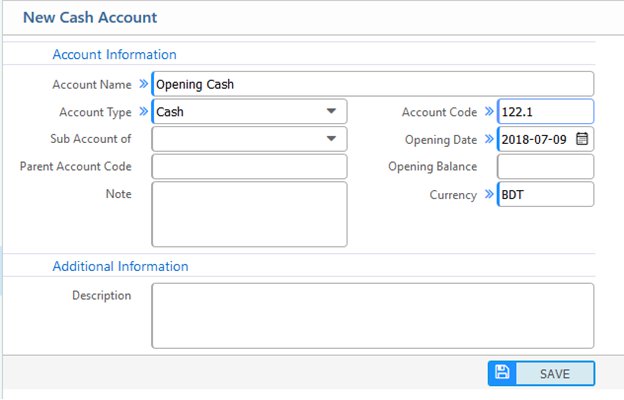
1) Account Name: Name of the cash account
2) Account Type: Type of cash (default type of account for cash account is cash in the application)
3) Sub Account: If you want to provide this cash account as a sub account of any other cash account (Note that in the above screenshot this new account is going to add as a subaccount of head office cash)
4) Account Code: Following the International Standad of account providing the code or if you want to customize a code in your own style for identifying the cash account with a code
5) Opening Date: Date of Opening the Cash Account
6) Opening Balance: Opening Balance if you want to provide for the new cash account
7) Branch: Under which branch cash account is created (Note that it is only possible when you are creating the cash account will fall as a sub-account of other cash account)
- Creating Bank Account:
For creating a Bank Account
Go to: Settings--> Accounting---> New Bank Account
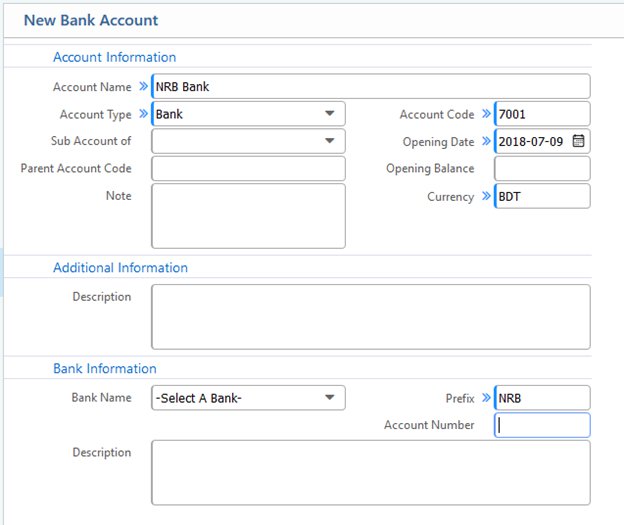
1) Account Name: Name of the New Bank account
2) Account Type: Type of account (Type is Bank)
3) Sub Account: If you want to provide this account as a sub account of any other existing Bank account
4) Account Code: Following the International Standard of account providing the code or if you want to customize a code in your own style for identifying the account with a code
5) Opening Date: Date of Opening the Bank Account
6) Opening Balance: Opening Balance if you want to provide any for the new Bank account
7) Branch: Under which branch account is created (Note that it is only possible when you are creating the account which will be a sub account of another account)
8) Bank Information: Defines the information on which bank you have created the account (Note this is just for information storage)
Bank Name: Name of the Bank where you have created the new account
Prefix: Prefix number if any
Account Number: Account number provided from the bank
Description field: if any or you want to provide any additional information
After creating all the accounts, you can check out list of accounts on the following accounts list page in the application
In order to see the chart of accounts or list of accounts, Go to: Settings--> Accounting--> Chart of Account
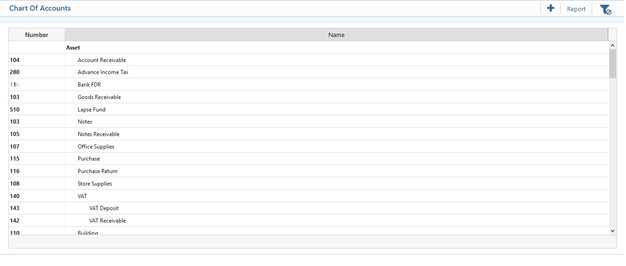
List shows all the accounts and their categories (i.e. Asset, Liabilities, Equities, Expense). All the accountings are shown with their accounting code.
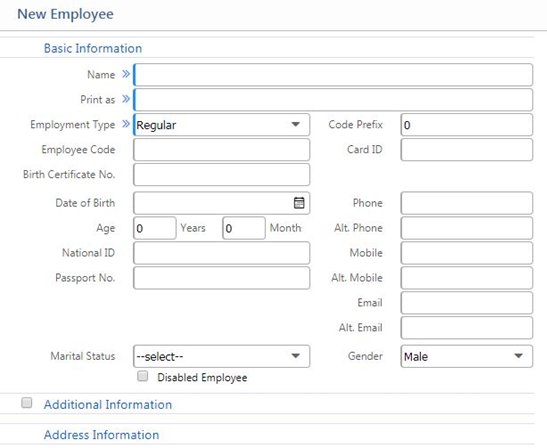
2) Adding Employee
From the Employee Menu Go to Employee--> Add Employee--> Single
Fill up the information field (mandatory fields) in order to complete the process of Adding Employee
3) PF Configuration:
For configuring PF, Go to Settings--> Configuration
After going to the configuration page, from the left tab select Provident Fund & Gratuity
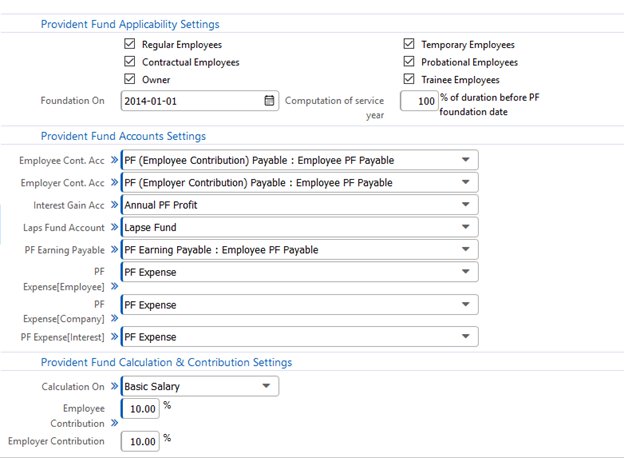
From Provident Fund Applicability settings, you may choose what type of employees you would want PF to be applicable for.
From Provident Fund Accounts Settings, you may choose which accounts are responsible for the transactions related to PF.
From Provident Fund Calculation and Contribution Settings, you may choose on what basis you are planning to perform the PF calculation.
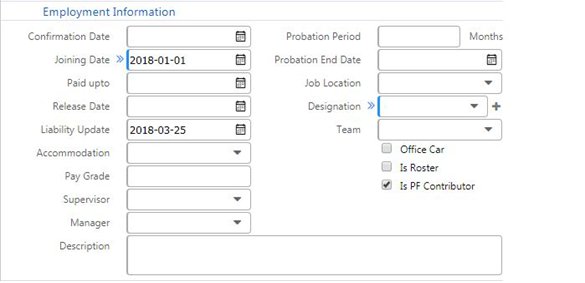
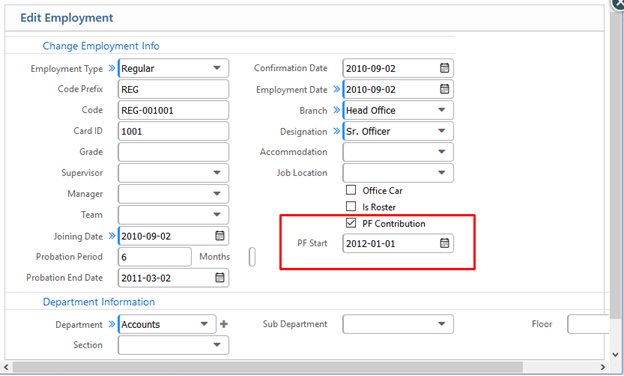
To enable PF for an employee, please tick on “Is PF contributor” under employment information. It is shown at the image above
4) PF Opening Balance:
In order to check or assing PF opening balance go to Employee--> List of Employees
Select the profile of the new employee which you have created, under the employee information, PF opening balance can be added
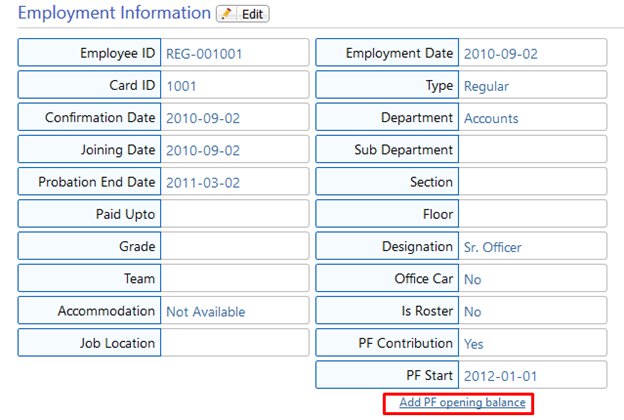
Separate entry field for Employee Contribution, Employer Contribution & Distributed Interest Amount.

Note: Make sure that the value for PF opening balance is accurate. Once it is entered, it cannot be edited later.
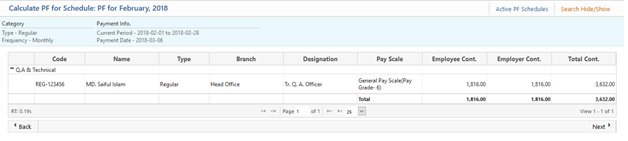
5) Active PF Schedules:
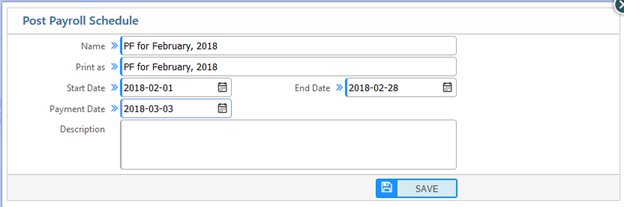
From the Menu: PF--> Active PF Schedule

On the right-hand side, you can see an option called ‘Post Schedule’ where you can choose for which month you want to post the PF.

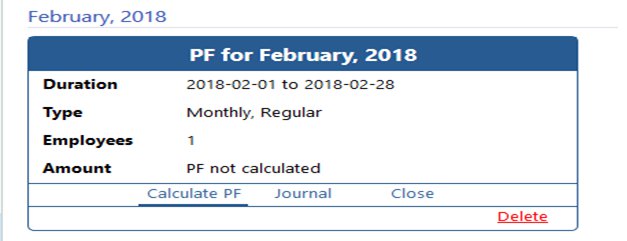
At this stage, it is very important to note that it is not suggested to delete an active PF schedule if you have made any errors in the PF calculation process. You are advised to select the ‘Rollback’ option to go back and edit any necessary changes before making final posting.
Make sure to take backup regularly before posting. You can take backup from Settings > backup and restore.
6) Post to Account
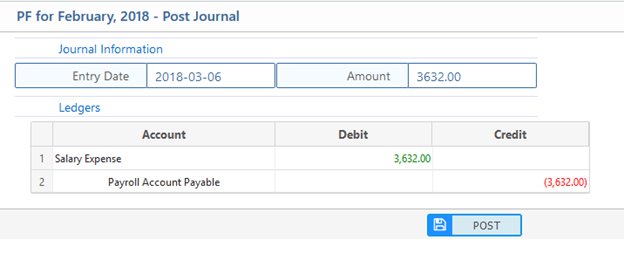
From the menu, click on: PF--> List of Earnings
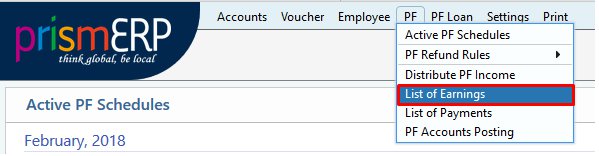
List of Earnings:
From the menu, select PF and then List of Earnings to check any PF related transactions being made. From this list you can easily find the recent earning of PF Schedule

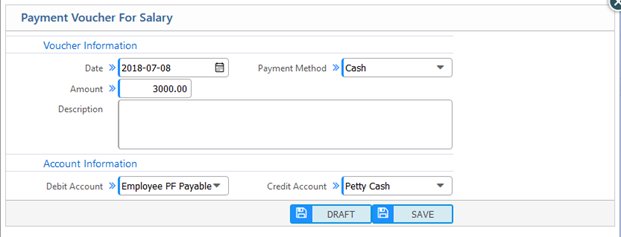
After clicking on Post Accounts on the right, you will land here. Click on Save to finalize the transaction.
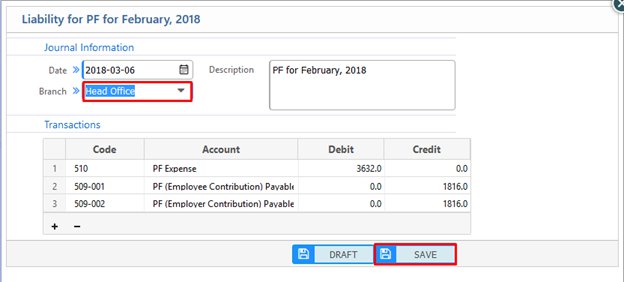
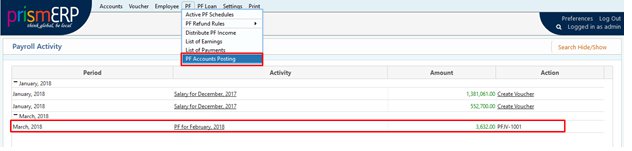
Tracking all the voucher number from PF
PF--> PF Accounts Postings
7) Distribute PF Income:
From the application you can distribute PF income by selecting " Distribute PF income " from PF menu. The following page will appear as shown below:
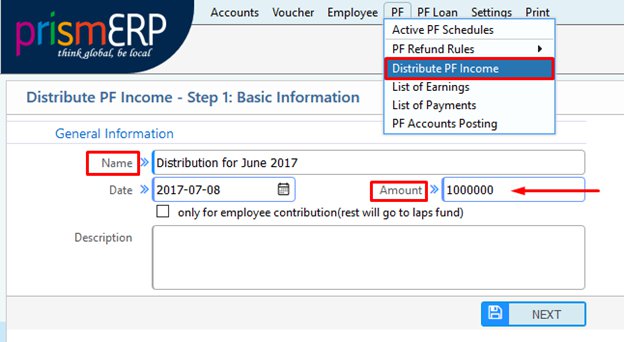
By clicking next, you will go through the further steps to input the necessary data related to PF income and the employee selected to get the PF income.
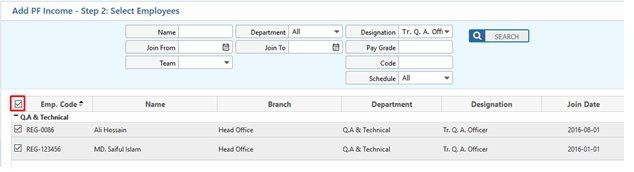
In the Step-2 you have provision of selecting employee.
In the Step-3 you can see employee wise distributed profit amount & edit option.

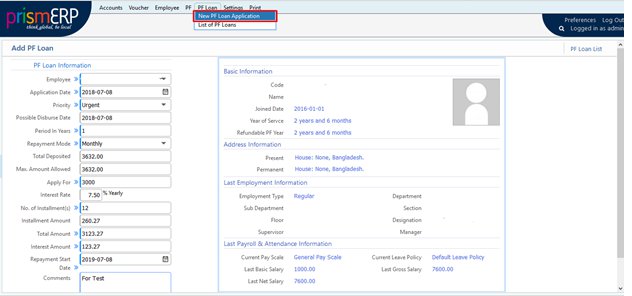
8) PF Loan:
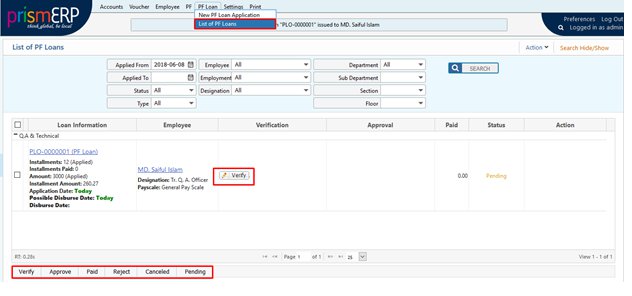
For activating PF Loan for an employee, go to PF Loan menu
PF Loan---> New PF Loan Application
From the loan list you can update the applied loan
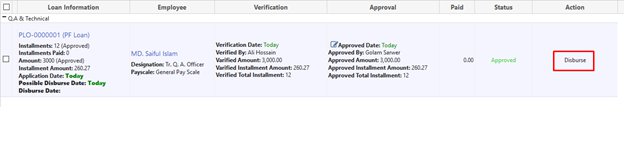
After Verification & Approval, Loan has to be disbursed
Give the repayment start date
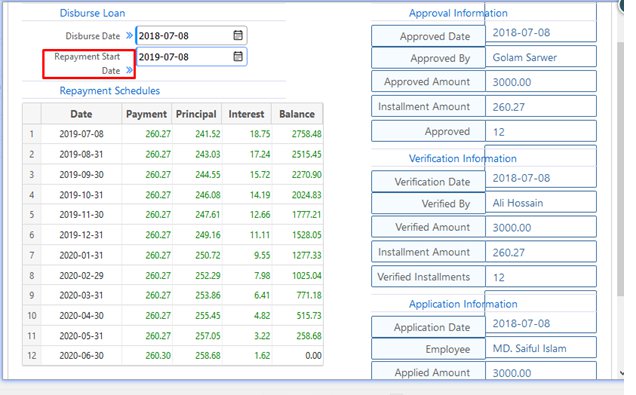
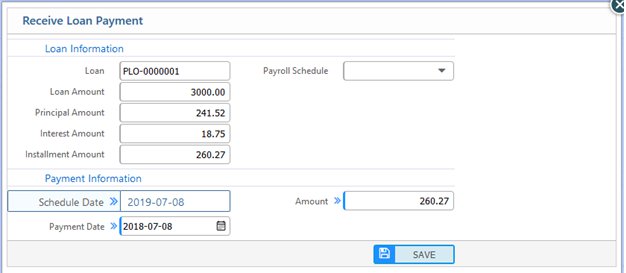
After Disburse Loan, you will get repayment option as given below:

8) List of Payments:
From the menu select PF and then List of Payments to check any payment related transactions has been made or not. From the list you can easily find the recent payements of Loan & Other payments.
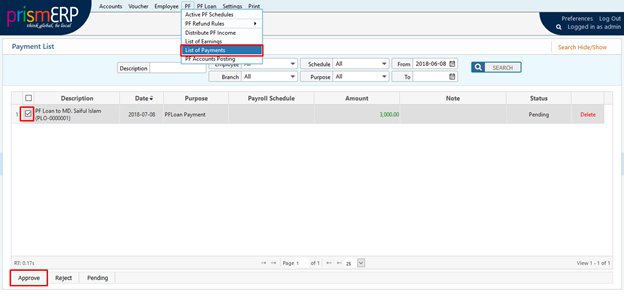
Post the amount to the accounts